کار با Alert Dialog در اندروید
آموزش Alert Dialog در اندروید
بعضی مواقع در برنامه ی خود اگر از کاربر بخواهید تصمیمی بگیرد و گزینه بله یا خیر را انتخاب کند که یا عمل خاصی انجام شود و یا در همان برنامه باقی بماند، می توانید از دیالوگ هشدار استفاده کنید.
برای ساختن یک دیالوگ هشدار لازم است که یک شئ از کلاس AlertDialogBuilder با یک کلاس داخلی AlertDialog بسازید. به صورت زیر .
AlertDialog.Builder alertDialogBuilder = new AlertDialog.Builder(this);
اکنون شما باید دکمه ی (yes) یا (no) را با استفاده از شئ کلاس AlertDialogBuilder تنظیم کنید. به صورت زیر:
alertDialogBuilder.setPositiveButton(CharSequence text, DialogInterface.OnClickListener listener)
alertDialogBuilder.setNegativeButton(CharSequence text, DialogInterface.OnClickListener listener)
علاوه بر این می توانید از عملکردهای ارائه شده توسط کلاس سازنده استفاده کنید تا دیالوگ هشدار را به دلخواه خود بسازید. این عملکردها در زیر ارائه شده اند.
- setIcon(Drawable icon)
این روش آیکن جعبه ی دیالوگ هشدار را تنظیم می کند. - setCancelable(boolean cancelable)
این روش ویژگی کنسل شدن یا نشدن دیالوگ را تنظیم می کند. - setMessage(CharSequence message)
این روش پیام را برای نمایش در دیالوگ هشدار تنظیم می کند. -
setMultiChoiceItems(CharSequence[] items, boolean[] checkedItems, DialogInterface.OnMultiChoiceClickListener listener)
این روش لیست آیتم هایی را که باید در دیالوگ به عنوان محتوا نمایش داده شوند، تنظیم می کند. آیتم انتخاب شده توسط شنونده اطلاع داده می شود. - setOnCancelListener(DialogInterface.OnCancelListener onCancelListener)
این روش callBack را تنظیم می کند که اگر دیالوگ کنسل شود، فراخوانده می شود. -
setTitle(CharSequence title)
این روش عنوانی را تنظیم می کند که باید در دیالوگ ظاهر شود.
بعد از ایجاد و تنظیم سازنده ی دیالوگ، شما باید یک آلرت دیالوگ را با استفاده از فراخوانی متد ()Create کلاس سازنده ایجاد کنید.به صورت زیر:
AlertDialog alertDialog = alertDialogBuilder.create();
alertDialog.show();
این ترکیب دیالوگ هشدار ایجاد خواهد کرد و آن را روی صفحه نمایش خواهد داد.
مثال زیر AlertDialog را در اندروید توضیح می دهد. این مثال از سه فعالیت متفاوت برای توضیح آن استفاده می کند. دیالوگ از شما می پرسد که به سمت انجام فعالیت، انجام ندادن آن یا کنسل کردن آن بروید. برای انجام آزمایشبا این مثال شما نیاز به یک دستگاه حقیقی و یا شبیه ساز دارید.
Dialog fragment
قبل از ورود به این مثال ما باید اطلاعاتی در مورد dialog fragment داشته باشیم.
Dialog fragment یک فرگمنتی است که می تواند آن را در یک دیالوگ باکس نمایش دهد.
public class DialogFragment extends DialogFragment {
   @Override
   public Dialog onCreateDialog(Bundle savedInstanceState) {
      // Use the Builder class for convenient dialog construction
      AlertDialog.Builder builder = new AlertDialog.Builder(getActivity());
      builder.setPositiveButton(R.string.fire, new DialogInterface.OnClickListener() {
         public void onClick(DialogInterface dialog, int id) {
            toast.makeText(this,"enter a text here",Toast.LENTH_SHORT).show();
         }
      })
      .setNegativeButton(R.string.cancel, new DialogInterface.OnClickListener() {
         public void onClick(DialogInterface dialog, int id) {
            finish();
         });
         // Create the AlertDialog object and return it
         return builder.create();
      }
   }
}
List dialog
از این گزینه زمانی استفاده می شود که بخواهیم لیستی از آیتم ها را در دیالوگ باکس نمایش دهیم.
فرض کنید کاربر نیاز دارد تا یک لیستی از آیتم ها را انتخاب کند یا همچنین نیاز دارد که روی یک آیتم از لیستهای متعدد آیتم ها کلیک کند.در این حالات از List Dialog استفاده می شود.
public Dialog onCreateDialog(Bundle savedInstanceState) {
   AlertDialog.Builder builder = new AlertDialog.Builder(getActivity());
   builder.setTitle(Pick a Color)

   .setItems(R.array.colors_array, new DialogInterface.OnClickListener() {
      public void onClick(DialogInterface dialog, int which) {
         // The 'which' argument contains the index position
         // of the selected item
      }
   });
   return builder.create();
}
Single-choice list dialog
از این گزینه زمانی استفاده می شود که بخواهیم یک لیست انتخاب را به دیالوگ باکس اضافه کنیم.به عنوان کاربر میتوانیم آن را در حالت انتخاب قرار دهیم یا آن را از حالت انتخاب خارج کنیم.
public Dialog onCreateDialog(Bundle savedInstanceState) {
   mSelectedItems = new ArrayList();
   AlertDialog.Builder builder = new AlertDialog.Builder(getActivity());

   builder.setTitle("This is list choice dialog box");
   .setMultiChoiceItems(R.array.toppings, null,new DialogInterface.OnMultiChoiceClickListener() {
      @Override
      public void onClick(DialogInterface dialog, int which, boolean isChecked) {

         if (isChecked) {
            // If the user checked the item, add it to the selected items
            mSelectedItems.add(which);
         }

         else if (mSelectedItems.contains(which)) {
            // Else, if the item is already in the array, remove it
            mSelectedItems.remove(Integer.valueOf(which));
         }
      }
   })

   // Set the action buttons
   .setPositiveButton(R.string.ok, new DialogInterface.OnClickListener() {
      @Override
      public void onClick(DialogInterface dialog, int id) {
         // User clicked OK, so save the mSelectedItems results somewhere
         // or return them to the component that opened the dialog
         ...
      }
   })

   .setNegativeButton(R.string.cancel, new DialogInterface.OnClickListener() {
      @Override
      public void onClick(DialogInterface dialog, int id) {
         ...
      }
   });
   return builder.create();
}
مثال زیر AlertDialog را در اندروید توضیح می دهد. این مثال از سه فعالیت متفاوت برای توضیح آن استفاده می کند. دیالوگ از شما می پرسد که به سمت انجام فعالیت، انجام ندادن آن یا کنسل کردن آن بروید. برای انجام آزمایشبا این مثال شما نیازبه یک دستگاه حقیقی و یا یک مقلد دارید.
- شما از Eclipse IDE برای ایجاد یک برنامه ی اندروید استفاده می کنید و آن را با عنوان AlertDialog تحت پکیج com.example.alertdialog قرار می دهید. در هنگام ایجاد این برنامه مطمئن شوید که Target SDK و Compile With در آخرین ورژن خود هستند تا بتوانید از سطوح بالاتر API ها استفاده کنید.
- فایل src/MainActivity.java را تغییر دهید تا برای آغاز دیالوگ کد دیالوگ هشدار اضافه کنید.
- فایل لی اوت XML (res/layout/activity_main.xml) را تغییر دهید و اگر لازم است مولفه ی GUI اضافه کنید.
- یک فعالیت جدید به نام PositiveActivity ایجاد کنید و آن را با مشاهده ی src/PositiveActivity.java تایید کنید.
- فایل لی اوت XML از آخرین فعالیت res/layout/activity_positive.xml را تغییر دهید و اگر لازم است مولفه ی GUI به آن اضافه کنید.
- یک فعالیت جدید به نام NegativeActivity ایجاد کنید و آن را با مشاهده ی src/NegativeActivity.java تایید کنید.
- فایل لی اوت XML از فعالیت های جدید res/layout/activity_negative.xml را تغییر دهید و اگر لازم است مولفه ی GUI اضافه کنید.
- res/values/strings.xml را تغییر دهید تا مقادیر ثابت لازم را تعریف کنید.
- برنامه را اجرا کنید و یک دستگاه اجرا کننده ی اندروید انتخاب کنید و برنامه را روی آن نصب کنید و نتایج را تایید کنید.
در اینجا کد تغییر یافته ی of src/com.example.alertdialog/MainActivity.java ارائه شده است.
package com.example.sairamkrishna.myapplication;
import android.app.AlertDialog;
import android.content.DialogInterface;
import android.content.Intent;
import android.support.v7.app.ActionBarActivity;
import android.os.Bundle;
import android.view.Menu;
import android.view.MenuItem;
import android.view.View;
import android.widget.Toast;
public class MainActivity extends ActionBarActivity {
@Override
protected void onCreate(Bundle savedInstanceState) {
super.onCreate(savedInstanceState);
setContentView(R.layout.activity_main);
}
public void open(View view){
AlertDialog.Builder alertDialogBuilder = new AlertDialog.Builder(this);
alertDialogBuilder.setMessage("Are you sure,You wanted to make decision");
alertDialogBuilder.setPositiveButton("yes", new DialogInterface.OnClickListener() {
@Override
public void onClick(DialogInterface arg0, int arg1) {
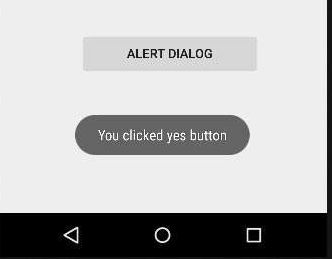
Toast.makeText(MainActivity.this,"You clicked yes button",Toast.LENGTH_LONG).show();
}
});
alertDialogBuilder.setNegativeButton("No",new DialogInterface.OnClickListener() {
@Override
public void onClick(DialogInterface dialog, int which) {
finish();
}
});
AlertDialog alertDialog = alertDialogBuilder.create();
alertDialog.show();
}
@Override
public boolean onCreateOptionsMenu(Menu menu) {
// Inflate the menu; this adds items to the action bar if it is present.
getMenuInflater().inflate(R.menu.menu_main, menu);
return true;
}
@Override
public boolean onOptionsItemSelected(MenuItem item) {
// Handle action bar item clicks here. The action bar will
// automatically handle clicks on the Home/Up button, so long
// as you specify a parent activity in AndroidManifest.xml.
int id = item.getItemId();
//noinspection SimplifiableIfStatement
if (id == R.id.action_settings) {
return true;
}
return super.onOptionsItemSelected(item);
}
}
در اینجا کد تغییر یافته ی res/layout/activity_main.xml را مشاهده می کنید.
<RelativeLayout xmlns:android="http://schemas.android.com/apk/res/android"
   xmlns:tools="http://schemas.android.com/tools" android:layout_width="match_parent"
   android:layout_height="match_parent" android:paddingLeft="@dimen/activity_horizontal_margin"
   android:paddingRight="@dimen/activity_horizontal_margin"
   android:paddingTop="@dimen/activity_vertical_margin"
   android:paddingBottom="@dimen/activity_vertical_margin"
   tools:context=".MainActivity">

   <TextView
      android:layout_width="wrap_content"
      android:layout_height="wrap_content"
      android:text="Alert Dialog"
      android:id="@+id/textView"
      android:textSize="35dp"
      android:layout_alignParentTop="true"
      android:layout_centerHorizontal="true" />

   <TextView
      android:layout_width="wrap_content"
      android:layout_height="wrap_content"
      android:text="Tutorialspoint"
      android:id="@+id/textView2"
      android:textColor="#ff3eff0f"
      android:textSize="35dp"
      android:layout_below="@+id/textView"
      android:layout_centerHorizontal="true" />

   <ImageView
      android:layout_width="wrap_content"
      android:layout_height="wrap_content"
      android:id="@+id/imageView"
      android:src="@drawable/logo"
      android:layout_below="@+id/textView2"
      android:layout_alignRight="@+id/textView2"
      android:layout_alignEnd="@+id/textView2"
      android:layout_alignLeft="@+id/textView"
      android:layout_alignStart="@+id/textView" />
   <Button
      android:layout_width="wrap_content"
      android:layout_height="wrap_content"
      android:text="Alert dialog"
      android:id="@+id/button"
      android:layout_below="@+id/imageView"
      android:layout_alignRight="@+id/textView2"
      android:layout_alignEnd="@+id/textView2"
      android:layout_marginTop="42dp"
      android:onClick="open"
      android:layout_alignLeft="@+id/imageView"
      android:layout_alignStart="@+id/imageView" />

</RelativeLayout>
در اینجا کد تغییر یافته ی Strings.xml را مشاهده می کنید
<resources>
    <string name="app_name">My Application</string>
    <string name="hello_world">Hello world!</string>
    <string name="action_settings">Settings</string>
</resources>
در اینجا کد پیش فرض AndroidManifest.xml را مشاهده می کنید
<?xml version="1.0" encoding="utf-8"?>
<manifest xmlns:android="http://schemas.android.com/apk/res/android"
   package="com.example.alertdialog"
   android:versionCode="1"
   android:versionName="1.0" >

   <application
      android:allowBackup="true"
      android:icon="@drawable/ic_launcher"
      android:label="@string/app_name"
      android:theme="@style/AppTheme" >

      <activity
         android:name="com.example.sairamkrishna.myapplication.MainActivity"
         android:label="@string/app_name" >

         <intent-filter>
            <action android:name="android.intent.action.MAIN" />
            <category android:name="android.intent.category.LAUNCHER" />
         </intent-filter>

      </activity>

   </application>
</manifest>
اجازه بدهید برنامه ی دوربین شما را اجرا کنیم. فرض می کنیم که دستگاه موبایل خود را به کامپیوتر متصل کرده اید.برای اجرای برنامه از Eclipse یکی ازفایل های فعالیت برنامه ی خود را باز کرده و از تول بار روی آیکن Run کلیک کنید.
دستگاه موبایل خود را به عنوان یک گزینه انتخاب کنید و سپس آن را بررسی کنید که صفحه ی زیر را نمایش دهد.
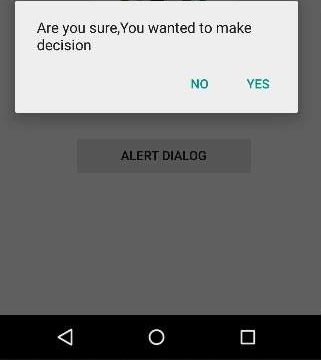
یک گزینه را انتخاب کنید و روی آن کلیک کنید.اگر شما روی yes کلیک کنید نتیجه ای به صورت زیر دارید.
اگر روی no کلیک کنید متد finish() فراخوانی می شود و از برنامه خارج می شود.
- نوشته شده توسط سعید نوشادی
- بازدید: 7152