امکانات منوی Actions در فتوشاپ
آموزش امکانات منوی Actions
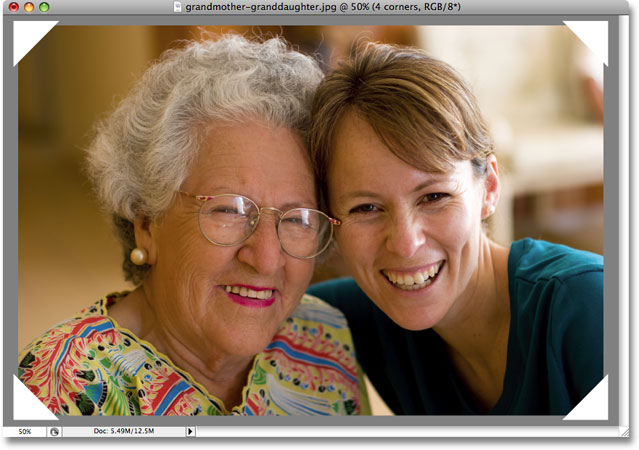
در این بخش از آموزش فتوشاپ به معرفی سایر امکانات بخش Actions خواهیم پرداخت، و چگونگی ساختن یک قاب برای عکس دلخواه خود را فرا خواهیم گرفت.
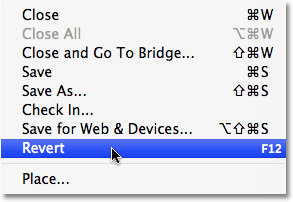
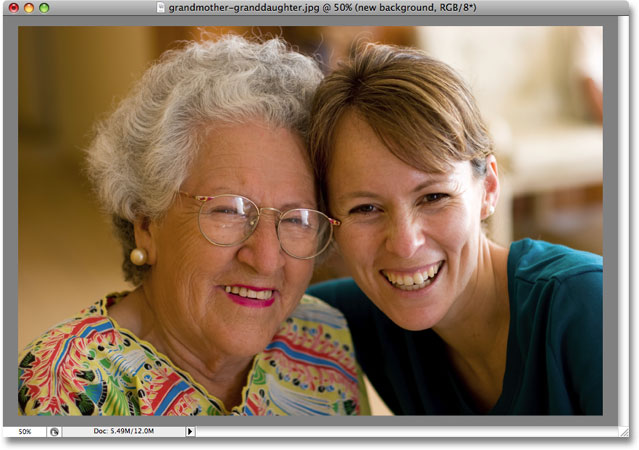
در ابتدا و قبل از هر کاری می بایست افکت های از قبل انجام شده توسط کاربر بر روی عکس را برداشته و عکس خود را به حالت اولیه و اصلی برگردانیم، برای این کار بر روی منوی File کلیک کرده و سپس گزینه ی Revert را انتخاب می کنیم:
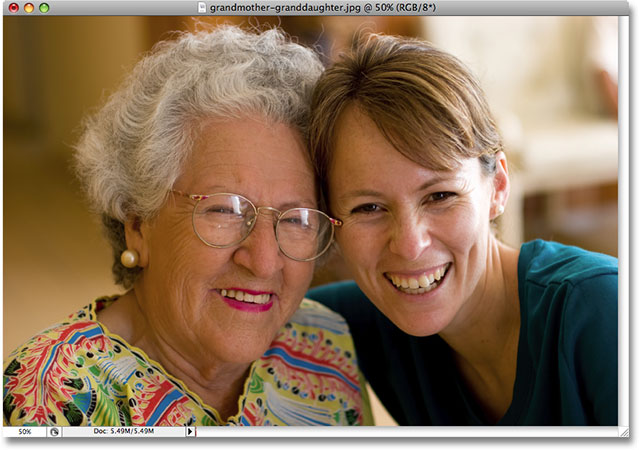
مشاهده می شود که عکس به حالت اولیه بر خواهد گشت:
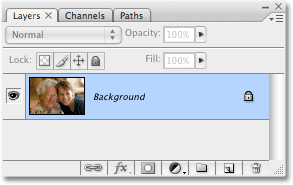
این تغییرات در پنل لایه ها نیز مشاهده می شود.
مراحل انجام کار :
یادگیری "آموزش امکانات منوی Actions "شامل 21 مرحله ی زیر است :
- مرحله 1 : ساخت یک Snapshot
- مرحله 2 : تغییر حالت
- مرحله 3 : کپی گرفتن از لایه
- مرحله 4 : تغییر در بزرگ نمایی عکس
- مرحله 5 : ساخت لایه
- مرحله 6 : گزینه Fill
- مرحله 7 : حرکت دادن لایه
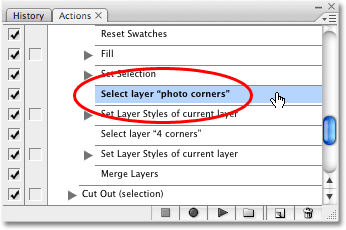
- مرحله 8 : انتخاب گزینه Select Layer Photo Corners
- مرحله 9 : ساخت لایه
- مرحله 10 الی 13 : انتخاب حالت برای لایه Photo Corner
- مرحله 14 : گزینه Reset Swatches
- مرحله 15 : گزینه Fill
- مرحله 16 : گزینه Set Selection
- مرحله 17 : انتخاب گزینه Select layer photo corners
- مرحله 18 : انتخاب گزینه Set Layer Styles of current layer
- مرحله 19 : انتخاب گزینه Select layer 4 corners
- مرحله 20 : انتخاب گزینه Set Layer Styles of current layer
- مرحله 21 : انتخاب گزینه Marge Layers
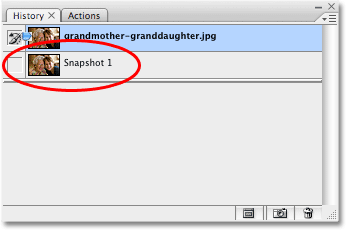
مرحله 1 : ساخت یک Snapshot
برای این کار دکمه ی Ctrl در سیستم های ویندوز و یا Command در سیستم های Mac را نگه داشته، مشاهده می شود که منوی Actions ظاهر خواهد شد، بر روی اولین گزینه ی این منو کلیک می کنیم:
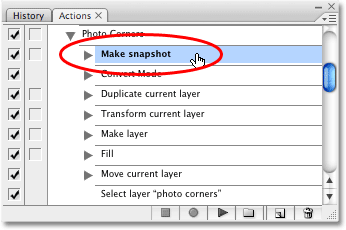
حال اگر به پنجره ی History برویم، مشاهده می شود که یک Snapshot از عکس اصلی تهیه شده است.
مرحله 2 : تغییر حالت
در منوی باز شده ی قبلی بر روی گزینه ی دوم کلیک می کنیم:
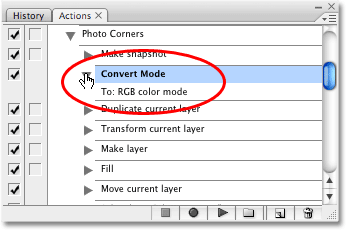
مشاهده می شود که با انتخاب هر کدام از حالات نشان داده شده قادر خواهیم بود حالت و فرمت عکس را تغییر دهیم.
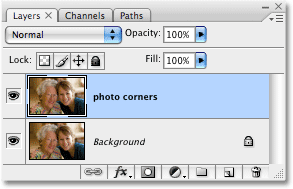
مرحله 3 : کپی گرفتن از لایه
ابن بار بر روی گزینه ی سوم منوی باز شده کلیک می کنیم:
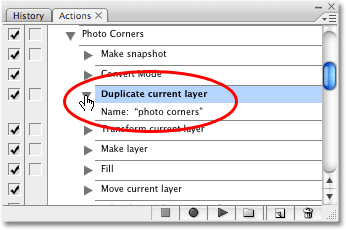
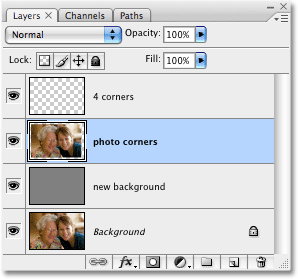
با انجام این کار مشاهده می شود که یک کپی از لایه و عکس مد نظر با عنوان Photo Corners در پنل لایه ها ایجاد شده است.
مرحله 4 : تغییر در بزرگ نمایی عکس
بر روی گزینه ی چهارم از منوی Actions کلیک می کنیم:
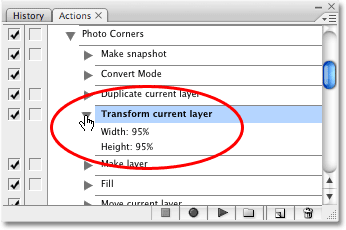
حال با انتخاب یکی از حالات نشان داده شده در منو می توانیم به صورت دلخواه خود، در عکس اولیه تغییرات سایز را انجام دهیم.

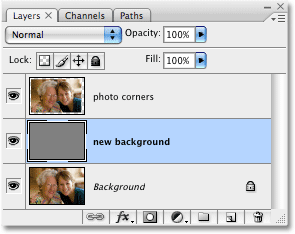
مرحله 5 : ساخت لایه
بر روی گزینه ی Make Layer از منوی باز شده کلیک می کنیم:
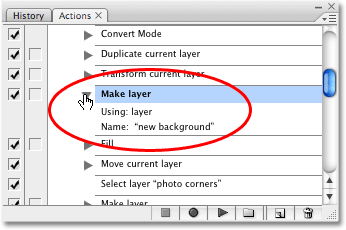
مشاهده می شود که اگر به پنل لایه ها برویم، یک لایه ی جدید با نام New Background به وجود آمده است.
مرحله 6 : گزینه Fill
بر روی گزینه ی Fill از منوی باز شده کلیک می کنیم:
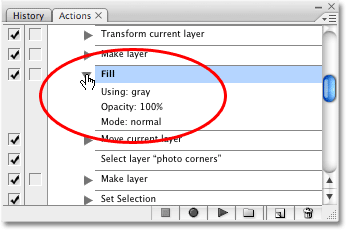
با نگه داشتن دکمه ی Ctrl در سیستم های ویندوز و یا Command در سیستم های Mac و دو بار کلیک بر روی گوشه ای از صفحه و برگشت به منوی اصلی مشاهده می کنیم که عکس مد نظر ناپدید شده است.

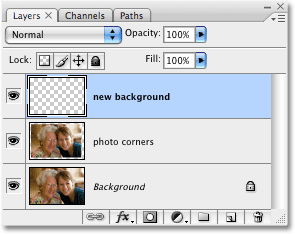
مرحله 7 : حرکت دادن لایه
گزینه ی هفتم از منوی Actions را انتخاب می کنیم، در این قسمت می خواهیم لایه ی New Background را بالای لایه ی Background قرار دهیم:
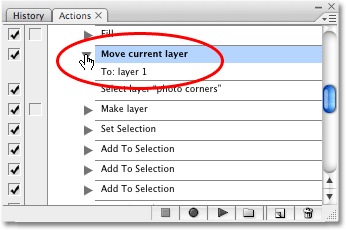
با برگشت به منوی اصلی و پنل لایه ها مشاهده می شود که جابه جایی مد نظر انجام شده است.
همان طور که مشخص است با انجام این کار، عکس اصلی جلوتر از لایه ی خالی خاکستری رنگ قرار گرفته است.
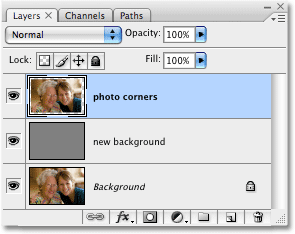
مرحله 8 : انتخاب گزینه Select Layer Photo Corners
گزینه ی Select Layer Photo Corners از منوی Actions را انتخاب می کنیم:
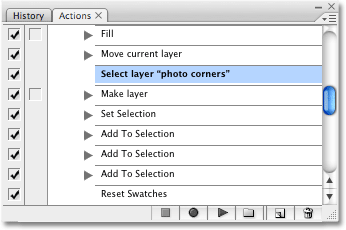
مشاهده می شود که در پنل لایه ها، لایه ی Photo Corners انتخاب شده است.
مرحله 9 : ساخت لایه
بر روی گزینه ی نهم از منوی باز شده یا همان Make Layer کلیک می کنیم:
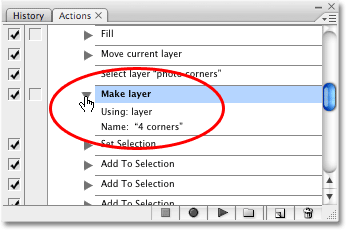
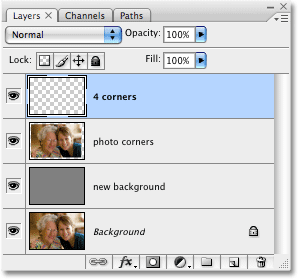
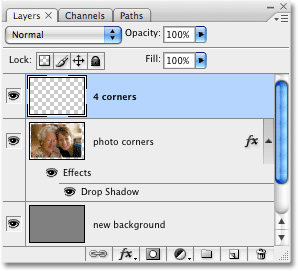
مشاهده می شود که در پنل لایه ها، لایه ی Corners 4 به وجود آمده است.
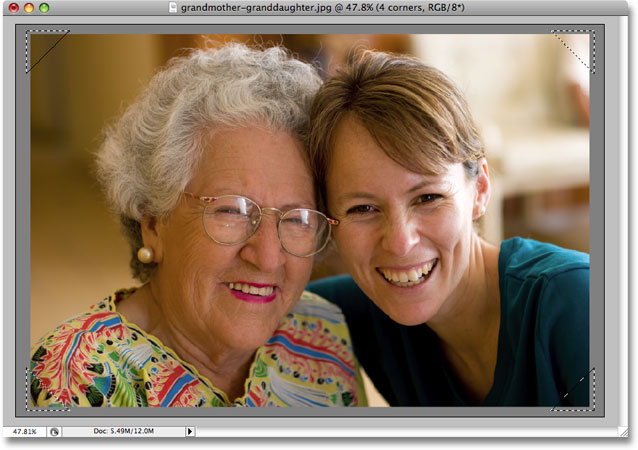
مرحله 10 الی 13 : انتخاب حالت برای لایه Photo Corner
بر روی گزینه ی Set Selection کلیک کرده و با گرفتن دکمه ی Shift بر روی گزینه های Add To Selection کلیک می کنیم:
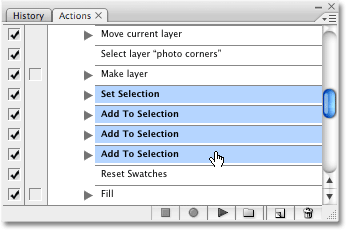
برای اجرای همزمان موارد انتخاب شده بر روی آیکن فلش مانند نشان داده شده در شکل کلیک می کنیم:
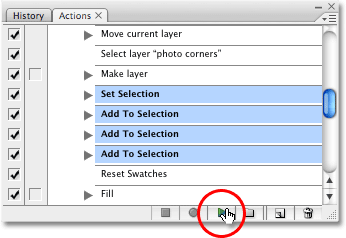
تغییرات در عکس مشخص می شوند.
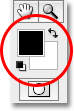
مرحله 14 : گزینه Reset Swatches
در این قسمت از آموزش امکانات منوی Actions بر روی این گزینه در منوی ظاهر شده کلیک می کنیم:

با برگشت به منوی اصلی رنگ های مربوط به Foreground و Background را در کنار صفحه که به صورت پیش فرض انتخاب شده اند را مشاهده می کنیم.
مرحله 15 : گزینه Fill
در این قسمت از آموزش گزینه ی Fill را انتخاب می کنیم:
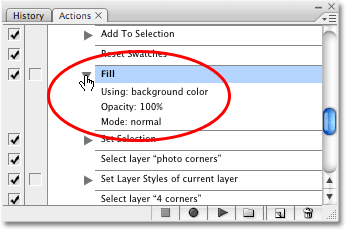
مشاهده می شود که رنگ مثلث های ایجاد شده در اطراف عکس به رنگ سفید در آمده اند.

توجه شود که این رنگ در حقیقت همان رنگ پیش فرض در تنظیمات اصلی رنگ ها بوده که قابل تغییر نیز می باشد.
مرحله 16 : گزینه Set Selection
بر روی گزینه ی Set Selection کلیک می کنیم:

حال با انتخاب گزینه ی None مشاهده می شود که خطوط نقطه چین دور مثلث های موجود در عکس ناپدید شده اند.
مرحله 17 : انتخاب گزینه Select layer photo corners
در این قسمت از آموزش بر روی گزینه Select layer photo corners از منوی Actions کلیک می کنیم:
مشاهده می شود که لایه ی Photo Corners انتخاب شده است.
مرحله 18 : انتخاب گزینه Set Layer Styles of current layer
بر روی این گزینه از منوی باز شده کلیک می کنیم:
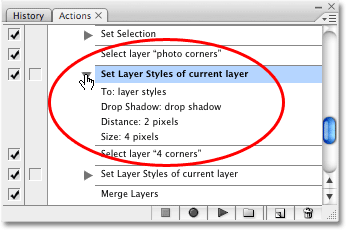
مشاهده می شود که یک حالت سایه مانند به اطراف عکس اضافه شده است، دقت شود که این افکت به سختی قابل دیدن خواهد بود.

مرحله 19 : انتخاب گزینه Select layer 4 corners
بر روی گزینه ی Select layer 4 corners از منوی Actions کلیک می کنیم:
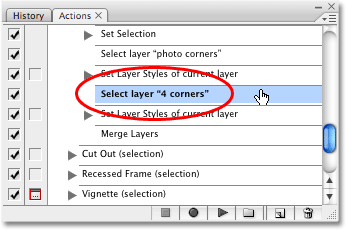
مشاهده می شود که در پنل لایه ها، لایه ی 4 corners انتخاب شده است.
مرحله 20 : انتخاب گزینه Set Layer Styles of current layer
بر روی این گزینه از منوی ظاهر شده کلیک می کنیم:
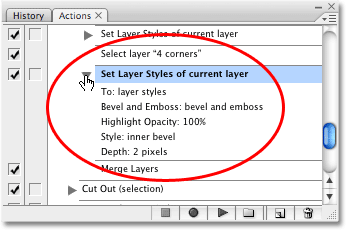
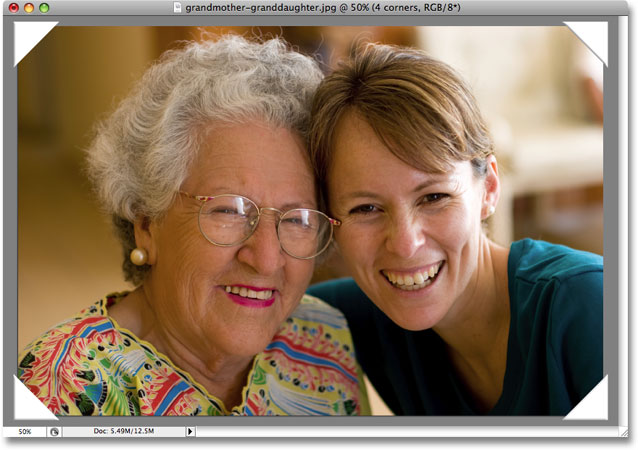
مشاهده می شود که گوشه های عکس با توجه به لایه ی 4 corners تنظیم شده است.
مرحله 21 : انتخاب گزینه Marge Layers
در این قسمت از آموزش گزینه ی Marge Layers را از منوی Actions انتخاب می کنیم:
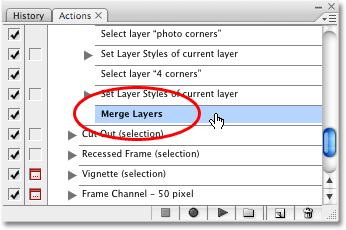
مشاهده می شود که در پنل لایه ها، لایه ی Corners 4 ناپدید شده است.

در اینجا، بخشی از امکانات منوی Actions را فرا گرفتیم.
- ویرایش Action در فتوشاپ
- پنل Actions در فتوشاپ
- ذخیره و بارگذاری Actions در فتوشاپ
- Actionهای پیش فرض در فتوشاپ
- نوشته شده توسط افشین رافت پور
- بازدید: 14543