پنجره Section Expert در Crystal Report - فرمت دهی بخش های مختلف گزارش
این پنجره، با انتخاب گزینه Section Expert از منوی Report ظاهر می شود.
Section Expert ابزار اولیه تغییر فرمت دهی بخش های مختلف گزارش است. با استفاده از آن می توانید تعدادی از گزینه ها را برای تعیین اینکه چه چیزی نمایش داده شود، چگونه نمایش داده شود و نمایش چه رنگی باشد تنظیم نمایید.
Section Expert
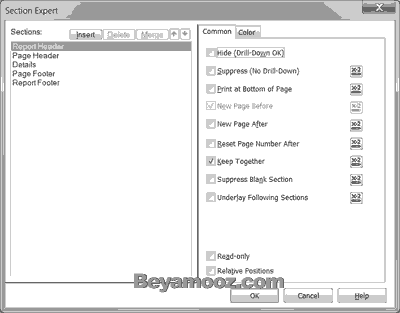
Sections (لیست بخش های فعال در گزارش)
لیستی از تمام بخش های فعال در گزارش را نشان می دهد. زمانی که یک بخش را انتخاب می کنید، برنامه دکمه های نشان داده شده در پنجره و خصوصیاتی که می توانید برای بخش انتخاب شده تنظیم کنید را فعال و یا غیر فعال می کند.
Insert (دکمه درج بخش جدید)
از این دکمه زمانی که بخواهید فوراً یک بخش جدید، شبیه نوع بخشی که در حالت انتخاب است و در زیر آن ایجاد کنید استفاده می شود. برای مثال اگر یک بخش Detail در حالت انتخاب داشته باشید و روی دکمه Insert کلیک نمایید، برنامه فوراً یک بخش Detail جدید در زیر آن ایجاد می کند.
Delete (دکمه حذف بخش ها)
از این دکمه برای حذف کردن بخشی که در حالت انتخاب است استفاده می شود. (بخش های اصلی گزارش که در شکل بالا لیست شده است را نمی توانید حذف کنید)
Merge (ادغام کردن)
از این دکمه زمانی که بخواهید بخشی که در حالت انتخاب است را با بخشی که در زیر آن است، ادغام کنید استفاده می شود. به عنوان مثال اگر سه بخش Details A و Details B و Details C داشته باشیم و بخش Details B در حالت انتخاب باشد و سپس دکمه Merge را کلیک کنید، برنامه بخش های Details B و Details C را با هم ادغام می کند.
توجه: بخش هایی که از دو نوع مختلف هستند را نمی توان با هم ادغام کرد (نمی توان بخش Details را با بخش Group Header ادغام کرد)
Arrow buttons (دکمه های پیکانی شکل جابه جایی)
از این دکمه ها برای حرکت دادن یک بخش نسبت به بخش های دیگر به بالا و پایین استفاده می شود. به عنوان مثال اگر سه بخش Details A و Details B و Details C را داشته باشیم و بخش Details B در حالت انتخاب باشد و سپس دکمه پیکانی شکل "بالا" را کلیک نمایید، برنامه بخش Details B را به بالا حرکت خواهد داد.
توجه: بخش هایی که از دو نوع مختلف هستند را نمی توان جابه جا نمود (نمی توان بخش Details را بعد از بخش Group Header قرار داد)
Conditional Formula (فرمول نویسی شرطی)
با کلیک روی این آیکن پنجره Formula Workshop باز می شود، با این ویرایشگر می توانید فرمولی بنویسید که شرطی را تست نماید. اگر شرط (true) باشد گزینه فرمت دهی انتخاب شده به کار می رود و در غیر اینصورت به کار نمی رود.
در سمت راست پنجره ،Section expert سه برگه با عناوین زیر وجود دارد:
- برگه Commom
- برگه Color
- برگه Layout
در زیر به بررسی آنها می پردازیم.
1- آشنایی با برگه Common
برای تنظیم اینکه چه چیز نمایش داده شود و چگونه نمایش داده شود استفاده می شود.
برگه Common
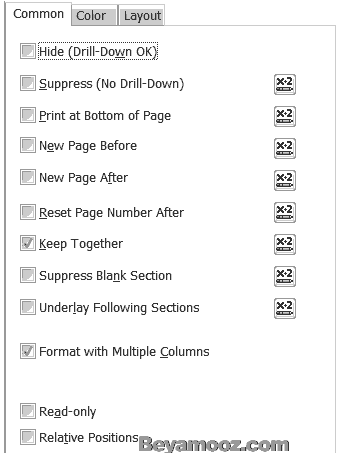
بخش را پنهان می سازد اما محتویات آن از طریق Drill-Down قابل رویت است.
Suppress (No Drill-Down)بخش و محتویات آن را پنهان می سازد.
Print at Bottom of Page
بخش را در انتهای صفحه چاپ می نماید. این گزینه برای بخش Details کاربردی ندارد اما برای بخش Report Footer مفید است که در غیر اینصرت باید در نزدیکی بالای آخرین صفحه گزارش چاپ شود.
This check box causes each group value to print only at the bottom of a page. (Details continue to print in their normal positions.) The command is useful for printing invoices and other reports where you want a single group (for example, line items grouped by order number) to appear on a page and the value for that group (subtotal, summary field, and so on) to print only at the bottom of the page.
New Page Before
بخش انتخاب شده را به جای اینکه بلافاصله پس از بخش قبلی قرار بگیرد در بالای صفحه جدید چاپ می نماید، احتمالاً در بخش Detail نمی توانید از آن استفاده نمایید اما برای بخش Group Header کاربرد دارد.
New Page Before is an available format property for Group (header and footer) and Details sections. When you select this option, the program inserts a page break before it prints the section. The page break thus comes before:
- The group (if using the option with a Group footer section).
- Each report record (if using the option with a Details section).
The Page Header and Page Footer appear on each page. If you have a subtotal or summary field in a Group Footer section, you can use the New Page Before option to put these values on pages following the value being totaled.
New Page After
یک بخش بعد از بخش انتخاب شده را در بالای صفحه جدید چاپ می نماید. این شبیه گزینه قبلی است البته بیشتر در بخش Group Footer کاربرد دارد.
When this check box is selected, the program inserts a page break after it prints the section.
- The Page Header and Page Footer appear on each page.
- Use New Page After in the Group footer section to print each group on a separate page.
Reset Page Number After
شماره گذاری صفحه را دوباره مرتب می کند تا از ابتدا شروع شود. اگز از این تنظیم برای یک Group Footer استفاده نمایید، اولین صفحه گروه بعدی با عدد 1 شماره گذاری می شود، بجای اینکه شماره صفحه قبلی گروه جاری افزوده شود.
Resets the page number to one (1) for the following page, after it prints a group total. When this option is used in conjunction with Print at Bottom of Page, the program prints a single group on a page, prints the group value at the bottom of the page, and resets the page number to 1 for the next page. This option is useful whenever you are printing multiple reports from a single file (for example, invoices), and you want each report to be numbered beginning with Page 1.
Keep Together
مانع می شود که یک صفحه از میانه یک بخش، شکسته شود. این خاصیت زمانی مفید است که یک بخش حاوی تعداد کمی از خطوط جزئیات باشد که باید به همراه هم نمایش داده شوند، و علیرغم جایی که رخ می دهند باید در یک صفحه قرار گیرند.
When this check box is selected, the program keeps all the lines of the section together, either on the current page (if there is room) or on the next (if not).
In a customer list, for example, data on a single customer (from a single record or linked records) may extend over several lines. If the standard page break falls within the data for a customer, the data will be split, part on one page, part on the next. But with Keep Together, the program inserts the page break before the record begins so that all the data will be printed together, on the following page.
Note: This option does not work with multi-line string or memo fields. A page break may occur in the middle of a multi-line field.
Suppress Blank Section
اگر بخشی خالی باشد، Gap میان بخش قبلی و بعدی را حذف می نماید. اگر این گزینه انتخاب نشده باشد، فضای خالی اختصاص یافته به بخش در گزارش موجود خواهد بود.
When you select this check box, the program hides the report section if it is blank, and prints it if it is not.
Underlay Following Sections
بخش را چاپ کرده و سپس تمام بخش های بعدی را در بالای این بخش چاپ می نماید. این تابع اغلب برای به کار بردن یک Watermark کوچک بر روی متن درون صفحه استفاده می شود.
Select this check box if you want the selected object to underlay the following section(s) when it prints. For an example, see Making an object underlay a following section.
Format with Multiple Columns
When you select this, the Layout tab (Section Expert) will appear.
Note: This option appears only when you've selected Details in the Sections list.
Reserve Minimum Page Footer
This option enables you to minimize the space reserved for your Page Footer sections, thereby maximizing the space available for valuable report information on each page. This option only affects a Page Footer area with multiple sections.
By default, Crystal Reports reserves space at the bottom of each page for your Page Footer sections. This space is reserved whether or not the Page Footer sections are conditionally suppressed. Normally, the space reserved is equivalent to the combined height of all Page Footer sections that are shown or conditionally suppressed.
You can, however, minimize the space reserved. To do so, first conditionally suppress individual Page Footers as desired. Then select Page Footer in the Sections area of the Section Expert, and select the Reserve Minimum Page Footer option on the Expert's Common tab. When you do this, Crystal Reports will only reserve space on each page for the tallest of your Page Footer sections.
Note: This option appears only when you've selected Page Footer in the Sections list.
Read-only
فرمت و محل تمام اشیاء بخش را قفل می نماید. در عمل تمام گزینه های ذکر شده در بالا را غیر فعال می سازد و به همین صورت تمام آنهایی که بطور نرمال در نوار ابزارها و منوهای میانبر وجود دارند.
This option makes a section read-only and locks the formatting and position of all the report objects it contains so they can't be formatted or moved. When you select this option, all other choices in the Section Expert become inactive. The formatting options that are usually available on the toolbars or shortcut menus are also suppressed for the section.
Relative Positions
محل نسبی اشیاء را در یک بخش ثابت می نماید. اگر شیئی حرکت نماید، فاصله نسبی آن با یک شی مجاور حفظ می شود.
This option allows you to lock the relative position of a report object next to a grid object within a section. For example, if you place a text object one centimeter to the right of a cross-tab object, during report generation the program will push the text object to the right, so that the one centimeter space is maintained regardless of the width of the cross-tab object.
Note:
- Only horizontal locking is possible. If you need to preserve relative vertical positioning, you should create a new report section.
- Once Relative Positions is selected for a section, you can no longer drag objects to new positions within that section. To change an object's position, use the Object Size and Position dialog box.
- Relative positioning applies only to objects placed to the right of grid objects (that is, objects that can grow horizontally).
2- آشنایی با برگه Color
برای تنظیم رنگ پس زمینه، برای بخش انتخاب شده استفاده می شود.
برگه Color
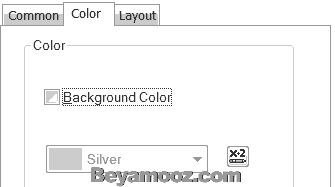
Background Color
برای اضافه کردن رنگ، به پس زمینه ی بخش انتخاب شده، این چک باکس را تیک بزنید و سپس رنگ دلخواهتان را انتخاب نمایید.
Conditional Formula
اگر می خواهید در بخش انتخاب شده (به عنوان مثال Details) بعضی از ردیف ها به ازای برقراری یک شرط، رنگ پس زمینه ویژه ای داشته باشند روی این دکمه کلیک نمایید.
3- آشنایی با برگه Layout
برگه Layout زمانی که بخش Details انتخاب شده باشد و در برگه Common خصوصیت "Format with Multiple Columns" را تیک بزنید ظاهر می شود.
از برگه Layout برای تنظیم گزارش در یک قالب چند ستونه استفاده می شود.
برگه Layout
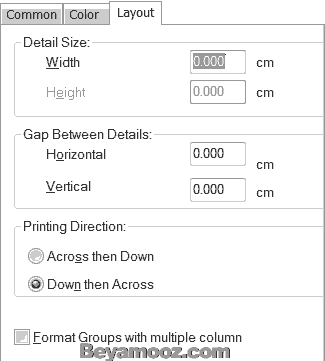
Use the Layout tab to set up your report in a multi-column format. That is, instead of having the data print straight down the page, you can set up multiple columns and have the data flow from column to column. You can also have your data print across then down the page, printing one record in each column, then printing a second record in each column, then a third, and so on. The dialog box is divided into four smaller boxes.
Detail size
می توانید ابعاد (height و width) بخش Details را در این باکس، تنظیم نمایید.
Gap between details
This box enables you to specify the empty area (gap, gutter, and so on) you want to allow between details. Horizontal = the gaps between details going across the page, Vertical = the gaps between details going down the page.
Determine the gaps you want to allow. Enter the horizontal gap in the Horizontal edit box and enter the vertical gap in the Vertical edit box.
Printing direction
The Printing direction box enables you to specify the path the program follows when printing the details on a report page. Your options are:
Across then Down
Prints details across the columns, one detail in the first column, one in the next, one in the next, and so on. Then, when all the columns have a detail, the program moves down the page and prints a second detail in the first column, then in the second, and so on.
Down then Across
Prints details down the first column, then down the second column, and so on.
Format groups with multiple column
Select this check box if you want the program to format groups with multiple columns using the Width, Gap between Details, and Printing Directions specified for the selected section.