آموزش پیکربندی کامپوننت در جوملا
همان طور که می دانید برای هر کدام از کامپوننت هایی که همراه با هسته جوملا نصب می شوند می توانید از طریق دکمه ی "انتخابها" در نوار ابزار بالایی، یکسری گزینه های پیکربندی را تنظیم نمایید.
با استفاده از framework جوملا می توانید براحتی برای هر کدام از کامپوننت ها، تعدادی پارامتر پیکربندی را در پایگاه داده ذخیره نمایید.
در پایان این آموزش خواهید توانست
بعد از نصب این قسمت از آموزش، خواهید دید که:
آموزش پیکربندی کامپوننت در جوملا
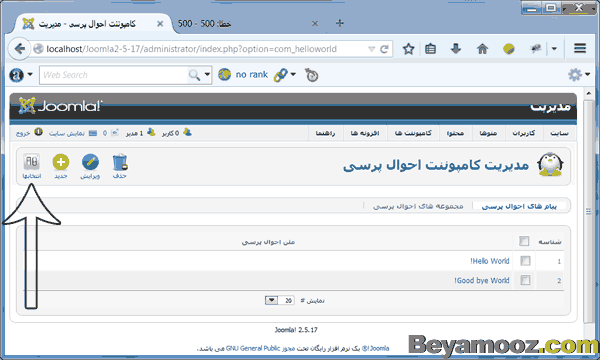
1- اضافه کردن دکمه انتخابها در کامپوننت های جوملا
زمانی که از منوی کامپوننت ها روی زیر منوی "کامپوننت احوال پرسی" کلیک کنید مطابق شکل زیر، دکمه ی "انتخابها" در نوار ابزار اضافه شده است:
2- تنظیمات گزینه های پیکربندی کامپوننت
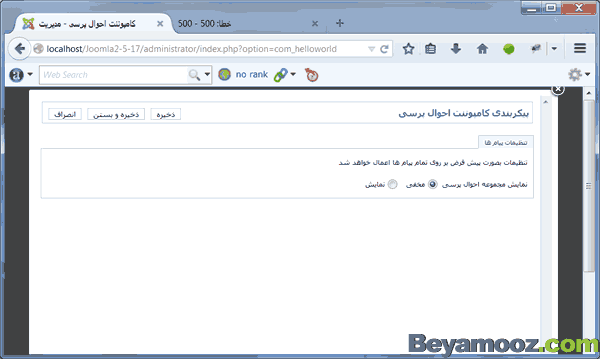
مطابق شکل زیر، زمانی که روی دکمه ی "انتخابها" کلیک کنید فرم زیر ظاهر می شود و می توانید نمایش داده شدن مجموعه ی پیام های احوال پرسی را تنظیم نمایید:
3- تنظیم اختصاصی گزینه های پیکربندی کامپوننت
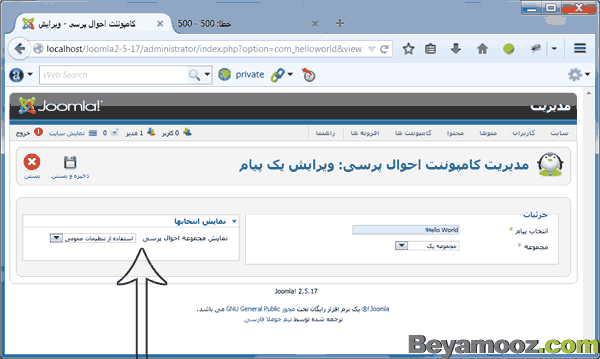
مطابق شکل زیر، زمانی که وارد فرم ویرایش یکی از پیام های احوال پرسی شوید، سمت چپ فرم اسلاید "نمایش انتخابها" اضافه شده است و می توانید بطور اختصاصی برای هر آیتم داده، پیکربندی را تنظیم نمایید:
فایل نصب کامپوننت
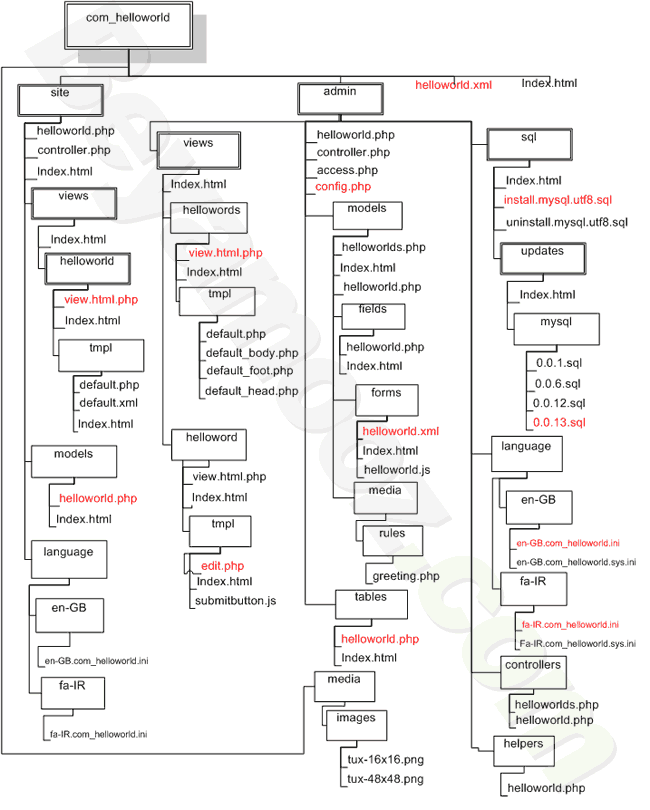
در فایل نصب کامپوننت، قسمت های قرمز رنگ مطابق شکل زیر، اضافه یا تغییر خواهند کرد:
 توجه: در انتهای این بیاموز، فایل نصب کامپوننت برای دانلود قرار داده شده است.
اضافه کردن تنظیمات پیکربندی کامپوننت در 8 مرحله
- اضافه کردن پارامترهای پیکربندی کامپوننت
- تنظیم پارامتر پیکربندی با استفاده از دکمه ی "انتخابها" در Toolbar کامپوننت
- تنظیم پارامتر پیکربندی هنگام ایجاد یا ویرایش پیام
- اصلاح جداول کامپوننت
- اصلاح TableHelloWorld
- اصلاح ویوی helloworld سمت مدیریت (backend)
- اصلاح ویوی helloworld سمت کاربر (frontend)
- اصلاح فایل helloworld.xml
مرحله 1- اضافه کردن پارامترهای پیکربندی کامپوننت
با استفاده از framework جوملا می توانید برای هر کامپوننت، تعدادی پارامتر پیکربندی در پایگاه داده ذخیره نمایید.
با ویرایشگر دلخواهتان فایل زیر را در شاخه admin اضافه نمایید:
admin/config.xml
<?xml version="1.0" encoding="utf-8"?>
<!-- $Id: helloworld.xml 14 2009-11-02 18:35:20Z chdemko $ -->
<config>
    <fieldset
        name="greetings"
        label="COM_HELLOWORLD_CONFIG_GREETING_SETTINGS_LABEL"
        description="COM_HELLOWORLD_CONFIG_GREETING_SETTINGS_DESC"
    >
        <field
            name="show_category"
            type="radio"
            label="COM_HELLOWORLD_HELLOWORLD_FIELD_SHOW_CATEGORY_LABEL"
            description="COM_HELLOWORLD_HELLOWORLD_FIELD_SHOW_CATEGORY_DESC"
            default="0"
        >
            <option value="0">JHIDE</option>
            <option value="1">JSHOW</option>
        </field>
    </fieldset>
</config>
این فایل توسط کامپوننت com_config در هسته جوملا خوانده می شود. در این لحظه، ما تنها یک پارامتر تعریف کردیم.
این پارامتر مشخص می کند که آیا عنوان مجموعه پیام، سمت کاربر (frontend) نمایش داده شود یا خیر.
در فایل زبان، 4 رشته استفاده شده در بالا را اضافه کنید:
admin\language\fa-IR\fa-IR.com_helloworld.ini
COM_HELLOWORLD_ADMINISTRATION="کامپوننت احوال پرسی - مدیریت"
COM_HELLOWORLD_HELLOWORLD_CREATING="کامپوننت احوال پرسی - ایجاد"
COM_HELLOWORLD_HELLOWORLD_EDITING="کامپوننت احوال پرسی - ویرایش"
COM_HELLOWORLD_HELLOWORLD_DETAILS="جزئیات"
COM_HELLOWORLD_HELLOWORLD_FIELD_GREETING_DESC="لطفاً پیام مورد نظرتان را انتخاب نمایید"
COM_HELLOWORLD_HELLOWORLD_FIELD_GREETING_LABEL="انتخاب پیام"
COM_HELLOWORLD_HELLOWORLD_FIELD_SHOW_CATEGORY_LABEL="نمایش مجموعه احوال پرسی"
COM_HELLOWORLD_HELLOWORLD_FIELD_SHOW_CATEGORY_DESC="اگر گزینه نمایش انتخاب شود، مجموعه ی پیام یا پیام ها سمت کاربر نمایش داده می شود"
COM_HELLOWORLD_HELLOWORLD_HEADING_GREETING="متن احوال پرسی"
COM_HELLOWORLD_HELLOWORLD_HEADING_ID="شناسه"
COM_HELLOWORLD_MANAGER_HELLOWORLDS="مدیریت کامپوننت احوال پرسی"
COM_HELLOWORLD_MANAGER_HELLOWORLD_NEW="مدیریت کامپوننت احوال پرسی: ثبت یک پیام"
COM_HELLOWORLD_MANAGER_HELLOWORLD_EDIT="مدیریت کامپوننت احوال پرسی: ویرایش یک پیام"
COM_HELLOWORLD_N_ITEMS_DELETED_1="یک پیغام حذف شد"
COM_HELLOWORLD_N_ITEMS_DELETED_MORE="%d پیام حذف شد"
COM_HELLOWORLD_HELLOWORLD_GREETING_LABEL="پیام"
COM_HELLOWORLD_HELLOWORLD_GREETING_DESC="لطفاً پیام مورد نظرتان را وارد کنید"

COM_HELLOWORLD_HELLOWORLD_FIELD_CATID_DESC="مجموعه ای که این پیام در آن قرار می گیرد"
COM_HELLOWORLD_HELLOWORLD_FIELD_CATID_LABEL="مجموعه"
COM_HELLOWORLD_SUBMENU_MESSAGES="پیام های احوال پرسی"
COM_HELLOWORLD_SUBMENU_CATEGORIES="مجموعه های احوال پرسی"
COM_HELLOWORLD_ADMINISTRATION_CATEGORIES="کامپوننت احوال پرسی - مدیریت مجموعه"

COM_HELLOWORLD_CONFIGURATION="پیکربندی کامپوننت احوال پرسی"
COM_HELLOWORLD_CONFIG_GREETING_SETTINGS_LABEL="تنظیمات پیام ها"
COM_HELLOWORLD_CONFIG_GREETING_SETTINGS_DESC="تنظیمات بصورت پیش فرض بر روی تمام پیام ها اعمال خواهد شد"
مرحله 2- تنظیم پارامتر پیکربندی با استفاده از دکمه ی "انتخابها" در Toolbar کامپوننت
بهترین روش برای تنظیم پارامترهای پیکربندی، استفاده از دکمه "انتخابها" یا "preference" در Toolbar کامپوننت است.
اگر این آموزش را از ابتدا دنبال فرموده باشید، می توانید حدس بزنید که برای اضافه کردن دکمه ی "انتخابها" باید در ویوی helloworlds کد بزنید. بنابراین فایل admin/views/helloworlds/view.html.php را بصورت زیر تغییر دهید:
admin/views/helloworlds/view.html.php
<?php
// No direct access to this file
defined('_JEXEC') or die('Restricted access');

// import Joomla view library
jimport('joomla.application.component.view');

/**
 * HelloWorlds View
 */
class HelloWorldViewHelloWorlds extends JView
{
    /**
     * HelloWorlds view display method
     * @return void
     */
    function display($tpl = null)
    {
        // Get data from the model
        $items = $this->get('Items');
        $pagination = $this->get('Pagination');

        // Check for errors.
        if (count($errors = $this->get('Errors')))
        {
            JError::raiseError(500, implode('<br />', $errors));
            return false;
        }
        // Assign data to the view
        $this->items = $items;
        $this->pagination = $pagination;

        // Set the toolbar
        $this->addToolBar();

        // Display the template
        parent::display($tpl);

        // Set the document
        $this->setDocument();
    }

    /**
     * Setting the toolbar
     */
    protected function addToolBar()
    {
        JToolBarHelper::title(JText::_('COM_HELLOWORLD_MANAGER_HELLOWORLDS'), 'helloworld');
        JToolBarHelper::deleteListX('', 'helloworlds.delete');
        JToolBarHelper::editListX('helloworld.edit');
        JToolBarHelper::addNewX('helloworld.add');
        JToolBarHelper::preferences('com_helloworld');
    }
    /**
     * Method to set up the document properties
     *
     * @return void
     */
    protected function setDocument()
    {
        $document = JFactory::getDocument();
        $document->setTitle(JText::_('COM_HELLOWORLD_ADMINISTRATION'));
    }
}
مرحله 3- تنظیم پارامتر پیکربندی هنگام ایجاد یا ویرایش پیام
ما می توانیم پارامتر "نمایش مجموعه" را اختصاصاً روی تمام پیام های احوال پرسی تعریف کنیم. در واقع زمان ایجاد یا ویرایش پیام های احوال پرسی، می توانید پارامتر "نمایش مجموعه" را تنظیم نمایید.
اگر این آموزش را از ابتدا دنبال فرموده باشید، می توانید حدس بزنید که برای شروع انجام این کار باید در فایل xml مربوط به فرم ویرایش پیام کد بزنیم.
بنابراین فایل admin/models/forms/helloworld.xml را بصورت زیر تغییر دهید:
admin/models/forms/helloworld.xml
<?xml version="1.0" encoding="utf-8"?>
<!-- $Id: helloworld.xml 60 2010-11-27 18:45:40Z chdemko $ -->
<form
    addrulepath="/administrator/components/com_helloworld/models/rules"
>
    <fieldset name="details">
        <field
            name="id"
            type="hidden"
        />
        <field
            name="greeting"
            type="text"
            label="COM_HELLOWORLD_HELLOWORLD_FIELD_GREETING_LABEL"
            description="COM_HELLOWORLD_HELLOWORLD_FIELD_GREETING_DESC"
            size="40"
            class="inputbox validate-greeting"
            validate="greeting"
            required="true"
            default=""
        />
        <field
            name="catid"
            type="category"
            extension="com_helloworld"
            class="inputbox"
            default=""
            label="COM_HELLOWORLD_HELLOWORLD_FIELD_CATID_LABEL"
            description="COM_HELLOWORLD_HELLOWORLD_FIELD_CATID_DESC"
            required="true"
        >
            <option value="0">JOPTION_SELECT_CATEGORY</option>
        </field>
    </fieldset>
    <fields name="params">
        <fieldset
            name="params"
            label="JGLOBAL_FIELDSET_DISPLAY_OPTIONS"
        >
            <field
                name="show_category"
                type="list"
                label="COM_HELLOWORLD_HELLOWORLD_FIELD_SHOW_CATEGORY_LABEL"
                description="COM_HELLOWORLD_HELLOWORLD_FIELD_SHOW_CATEGORY_DESC"
                default=""
            >
                <option value="">JGLOBAL_USE_GLOBAL</option>
                <option value="0">JHIDE</option>
                <option value="1">JSHOW</option>
            </field>
        </fieldset>
    </fields>
</form>
در کد بالا، پارامتر "show-category" با value یکی از مقادیر "استفاده از تنظیمات عمومی"، "مخفی" و یا "نمایش" می تواند تنظیم شود.
مرحله 4- اصلاح جداول کامپوننت
حالا داده های جدول پیام ها، شامل یک پارامتر جدید بنام "params" شده است.
بنابراین با ویرایشگر دلخواهتان فایل admin/sql/install.mysql.utf8.sql را بصورت زیر تغییر دهید:
admin/sql/install.mysql.utf8.sql
-- $Id: install.mysql.utf8.sql 60 2010-11-27 18:45:40Z chdemko $

DROP TABLE IF EXISTS `#__helloworld`;

CREATE TABLE `#__helloworld` (
  `id` int(11) NOT NULL AUTO_INCREMENT,
  `greeting` varchar(25) NOT NULL,
  `catid` int(11) NOT NULL DEFAULT '0',
  `params` TEXT NOT NULL DEFAULT '',
   PRIMARY KEY  (`id`)
) ENGINE=MyISAM AUTO_INCREMENT=0 DEFAULT CHARSET=utf8;

INSERT INTO `#__helloworld` (`greeting`) VALUES
        ('Hello World!'),
        ('Good bye World!');
اگر کامپوننت از ابتدا نصب نشود، و کاربر قصد به روز رسانی کامپوننت را داشته باشد، با توجه به نسخه نصبی کامپوننت، فایلی که در آدرس admin/sql/updates/mysql قرار دارد اجرا خواهد شد.
بنابراین فایل admin/sql/updates/mysql/0.0.13.sql با محتوای زیر را ایجاد نمایید:
admin/sql/updates/mysql/0.0.13.sql
ALTER TABLE `#__helloworld` ADD `params` VARCHAR(1024) NOT NULL DEFAULT '';
مرحله 5- اصلاح TableHelloWorld
برای کار کردن با پارامتر جدید "نمایش مجموعه" باید TableHelloWorld اصلاح شود. این نوع پارامترها در فرمت JSON ذخیره می شوند و از طریق کلاس JParameter مقادیر آنها قابل دسترس است. ما باید متدهای ()bind و ()load را overload کنیم.
با ویرایشگر دلخواهتان فایل admin/tables/helloworld.php را بصورت زیر تغییر دهید:
admin/tables/helloworld.php
<?php
// No direct access
defined('_JEXEC') or die('Restricted access');

// import Joomla table library
jimport('joomla.database.table');

/**
 * Hello Table class
 */
class HelloWorldTableHelloWorld extends JTable
{
    /**
     * Constructor
     *
     * @param object Database connector object
     */
    function __construct(&$db)
    {
        parent::__construct('#__helloworld', 'id', $db);
    }
    /**
     * Overloaded bind function
     *
     * @param       array           named array
     * @return      null|string     null is operation was satisfactory, otherwise returns an error
     * @see JTable:bind
     * @since 1.5
     */
    public function bind($array, $ignore = '')
    {
        if (isset($array['params']) && is_array($array['params']))
        {
            // Convert the params field to a string.
            $parameter = new JRegistry;
            $parameter->loadArray($array['params']);
            $array['params'] = (string)$parameter;
        }
        return parent::bind($array, $ignore);
    }

    /**
     * Overloaded load function
     *
     * @param       int $pk primary key
     * @param       boolean $reset reset data
     * @return      boolean
     * @see JTable:load
     */
    public function load($pk = null, $reset = true)
    {
        if (parent::load($pk, $reset))
        {
            // Convert the params field to a registry.
            $params = new JRegistry;
            $params->loadJSON($this->params);
            $this->params = $params;
            return true;
        }
        else
        {
            return false;
        }
    }
}
مرحله 6- اصلاح ویوی helloworld سمت مدیریت (backend)
ویوی helloworld سمت مدیریت باید پارامترهای پیکربندی را نمایش دهد.
با ویرایشگر دلخواهتان فایل admin/views/helloworld/tmpl/edit.php را بصورت زیر تغییر دهید:
admin/views/helloworld/tmpl/edit.php
<?php
// No direct access
defined('_JEXEC') or die('Restricted access');
JHtml::_('behavior.tooltip');
JHtml::_('behavior.formvalidation');
$params = $this->form->getFieldsets('params');
?>
<form action="<?php echo JRoute::_('index.php?option=com_helloworld&layout=edit&id='.(int) $this->item->id); ?>" method="post" name="adminForm" id="helloworld-form" class="form-validate">
    <div class="width-60 fltlft">
        <fieldset class="adminform">
            <legend><?php echo JText::_( 'COM_HELLOWORLD_HELLOWORLD_DETAILS' ); ?></legend>
            <ul class="adminformlist">
<?php foreach($this->form->getFieldset('details') as $field): ?>
                <li><?php echo $field->label;echo $field->input;?></li>
<?php endforeach; ?>
            </ul>
    </div>

    <div class="width-40 fltrt">
        <?php echo JHtml::_('sliders.start', 'helloworld-slider'); ?>

<?php foreach ($params as $name => $fieldset): ?>
        <?php echo JHtml::_('sliders.panel', JText::_($fieldset->label), $name.'-params');?>
    <?php if (isset($fieldset->description) && trim($fieldset->description)): ?>
        <p class="tip"><?php echo $this->escape(JText::_($fieldset->description));?></p>
    <?php endif;?>
        <fieldset class="panelform" >
            <ul class="adminformlist">
    <?php foreach ($this->form->getFieldset($name) as $field) : ?>
                <li><?php echo $field->label; ?><?php echo $field->input; ?></li>
    <?php endforeach; ?>
            </ul>
        </fieldset>
<?php endforeach; ?>

        <?php echo JHtml::_('sliders.end'); ?>
    </div>

    <div>
        <input type="hidden" name="task" value="helloworld.edit" />
        <?php echo JHtml::_('form.token'); ?>
    </div>
</form>
مرحله 7- اصلاح ویوی helloworld سمت کاربر (frontend)
با توجه به پارامتر جدید "نمایش مجموعه"، ویوی helloworld سمت کاربر (frontend) باید اصلاح شود.
مدل معادل ویوی بالا باید:
- پارامترهای عمومی و اختصاصی تنظیم شده را ترکیب کند.
- در صورت نیاز به نمایش مجموعه، باید آنرا فراهم کند.
با ویرایشگر دلخواهتان فایل site/models/helloworld.php را بصورت زیر تغییر دهید:
site/models/helloworld.php
// No direct access to this file
defined('_JEXEC') or die('Restricted access');
// import Joomla modelitem library
jimport('joomla.application.component.modelitem');
/**
* HelloWorld Model
*/
class HelloWorldModelHelloWorld extends JModelItem
{
/**
* @var object item
*/
protected $item;
/**
* Method to auto-populate the model state.
*
* This method should only be called once per instantiation and is designed
* to be called on the first call to the getState() method unless the model
* configuration flag to ignore the request is set.
*
* Note. Calling getState in this method will result in recursion.
*
* @return void
* @since 1.6
*/
protected function populateState()
{
$app = JFactory::getApplication();
// Get the message id
$id = JRequest::getInt('id');
$this->setState('message.id', $id);
// Load the parameters.
$params = $app->getParams();
$this->setState('params', $params);
parent::populateState();
}
/**
* Returns a reference to the a Table object, always creating it.
*
* @param type The table type to instantiate
* @param string A prefix for the table class name. Optional.
* @param array Configuration array for model. Optional.
* @return JTable A database object
* @since 1.6
*/
public function getTable($type = 'HelloWorld', $prefix = 'HelloWorldTable', $config = array())
{
return JTable::getInstance($type, $prefix, $config);
}
/**
* Get the message
* @return object The message to be displayed to the user
*/
public function getItem()
{
if (!isset($this->item))
{
$id = $this->getState('message.id');
$this->_db->setQuery($this->_db->getQuery(true)
->from('#__helloworld as h')
->leftJoin('#__categories as c ON h.catid=c.id')
->select('h.greeting, h.params, c.title as category')
->where('h.id=' . (int)$id));
if (!$this->item = $this->_db->loadObject())
{
$this->setError($this->_db->getError());
}
else
{
// Load the JSON string
$params = new JRegistry;
$params->loadJSON($this->item->params);
$this->item->params = $params;
// Merge global params with item params
$params = clone $this->getState('params');
$params->merge($this->item->params);
$this->item->params = $params;
}
}
return $this->item;
}
}
ویوی helloworld از مدل متناظرش، مجموعه را درخواست می کند. بنابراین با توجه به مدل بالا، فایل site/views/helloworld/view.html.php را بصورت زیر تغییر دهید:
site/views/helloworld/view.html.php
<?php
// No direct access to this file
defined('_JEXEC') or die('Restricted access');

// import Joomla view library
jimport('joomla.application.component.view');

/**
 * HTML View class for the HelloWorld Component
 */
class HelloWorldViewHelloWorld extends JView
{
    // Overwriting JView display method
    function display($tpl = null)
    {
        // Assign data to the view
        $this->item = $this->get('Item');

        // Check for errors.
        if (count($errors = $this->get('Errors')))
        {
            JError::raiseError(500, implode('<br />', $errors));
            return false;
        }
        // Display the view
        parent::display($tpl);
    }
}
حالا layout می توند مجموعه را بصورت صحیح نمایش دهد البته اگر پارامتر "نمایش مجموعه" با مقدار "نمایش" تنظیم شده باشد.
با ویرایشگر دلخواهتان فایل site/views/helloworld/tmpl/default.php را بصورت زیر تغییر دهید:
site/views/helloworld/tmpl/default.php
<?php
// No direct access to this file
defined('_JEXEC') or die('Restricted access');
?>
<h1><?php echo $this->item->greeting.(($this->item->category and $this->item->params->get('show_category')) ? (' ('.$this->item->category.')') : ''); ?></h1>
مرحله 8- اصلاح فایل helloworld.xml
اگر این آموزش را از ابتدا دنبال فرموده باشید، فقط کافی است تغییرات زیر را در فایل xml، اعمال نمایید: (رنگ سبز)
helloworld.xml
<?xml version="1.0" encoding="utf-8"?>
<!-- $Id: helloworld.xml 14 2009-11-02 18:35:20Z chdemko $ -->
<extension type="component" version="1.6.0" method="upgrade">
<name>COM_HELLOWORLD</name>
<!-- The following elements are optional and free of formatting conttraints -->
<creationDate>November 2009</creationDate>
<author>beyamooz</author>
<authorEmail>این آدرس ایمیل توسط spambots حفاظت می شود. برای دیدن شما نیاز به جاوا اسکریپت دارید </authorEmail>
<authorUrl>https://beyamooz.com</authorUrl>
<copyright>Copyright Info</copyright>
<license>License Info</license>
<!-- The version string is recorded in the components table -->
<version>0.0.13</version>
<!-- The description is optional and defaults to the name -->
<description>COM_HELLOWORLD_DESCRIPTION</description>
<install> <!-- Runs on install -->
<sql>
<file driver="mysql" charset="utf8">sql/install.mysql.utf8.sql</file>
</sql>
</install>
<uninstall> <!-- Runs on uninstall -->
<sql>
<file driver="mysql" charset="utf8">sql/uninstall.mysql.utf8.sql</file>
</sql>
</uninstall>
<update> <!-- Runs on update; New in 1.6 -->
<schemas>
<schemapath type="mysql">sql/updates/mysql</schemapath>
</schemas>
</update>
<!-- Site Main File Copy Section -->
<!-- Note the folder attribute: This attribute describes the folder
to copy FROM in the package to install therefore files copied
in this section are copied from /site/ in the package -->
<files folder="site">
<filename>index.html</filename>
<filename>helloworld.php</filename>
<filename>controller.php</filename>
<folder>views</folder>
<folder>models</folder>
<folder>language</folder>
</files>
<media destination="com_helloworld" folder="media">
<filename>index.html</filename>
<folder>images</folder>
</media>
<administration>
<!-- Administration Menu Section -->
<menu img="../media/com_helloworld/images/tux-16x16.png">COM_HELLOWORLD_MENU</menu>
<!-- Administration Main File Copy Section -->
<!-- Note the folder attribute: This attribute describes the folder
to copy FROM in the package to install therefore files copied
in this section are copied from /admin/ in the package -->
<files folder="admin">
<!-- Admin Main File Copy Section -->
<filename>index.html</filename>
<filename>config.xml</filename>
            <filename>access.php</filename>
            <filename>helloworld.php</filename>
            <filename>controller.php</filename>
            <!-- SQL files section -->
            <folder>sql</folder>
            <!-- tables files section -->
            <folder>tables</folder>
            <!-- models files section -->
            <folder>models</folder>
            <!-- views files section -->
            <folder>views</folder>
            <!-- controllers files section -->
            <folder>controllers</folder>
            <!-- helpers files section -->
            <folder>helpers</folder>
        </files>

        <languages folder="admin">
            <language tag="en-GB">language/en-GB/en-GB.com_helloworld.ini</language>
            <language tag="en-GB">language/en-GB/en-GB.com_helloworld.sys.ini</language>
            <language tag="fa-IR">language/fa-IR/fa-IR.com_helloworld.ini</language>
            <language tag="fa-IR">language/fa-IR/fa-IR.com_helloworld.sys.ini</language>
        </languages>
    </administration>

</extension>
دریافت فایل کامپوننت آموزشی Hello World (بخش سیزدهم - پیکربندی کامپوننت)
- ایجاد کننده:www.beyamooz.com
- خرید فایل:
 دانلود فایل کامپوننت Hello World
 - حجم فایل: 4 کیلو بایت
- قیمت: 1000 تومان
تمام درآمدها صرف پیشرفت بیاموز خواهد شد.



در صورتی که جواب تان مثبت است، بفرمایید تا دسترسی های لازم را در اختیارتون قرار بدهم. مطالب به زبان اصلی است و شما فقط باید ترجمه کنید.
من کامپوننت نویسی پایه رو خیلی خیلی خوب از سایت شما یاد گرفتم نمی دونم چه جوری ازتون تشکر کنم.
امیدوارم خدا جواب زحمتی که کشیدین رو بده و براتون آرزوی سعادت و موفقیت می کنم..
یک دنیا مرسی ی ی ی ی ی !
admin/views/helloworld/tmpl/edit.php
کد شروع
برای تایپ کردن تگ های HTML در قسمت دیدگاه ها، باید بجای علامت > از ;lt& و بجای علامت < از ;gt& استفاده کنید.
admin/views/helloworld/tmpl/edit.php
کد باز کردن تگ پی اچ پی حذف شده است.