ایجاد صفحه ی Login در اندروید
در این جلسه قصد داریم یک صفحه LoginScreen را در برنامه نویسی اندروید ایجاد کنیم.در این قسمت ما با Shape ها کار خواهیم کرد.برای شروع کار یک پروژه جدید ایجاد می کنید و نام آن را LoginScreen قرار دهید،در داخل لایه اصلی برنامه main.xml, از یک لیوت جدید از نوع RelativeLayout استفاده کنید. به این دلیل از RelativeLayout استفاده کردیم که حرکت دادن عناصر و مرتب سازی آنها خیلی راحت تر است،بعد از اینکه لایه را ایجاد کردیم ،در آن از دو Edittext یکی برای نام کاربری و دیگری برای رمز عبور استفاده کرده ایم و سپس در قسمت اخر از یک دکمه برای ورود به برنامه استفاده کردیم با عنوان LogIn.
<RelativeLayout xmlns:android="http://schemas.android.com/apk/res/android"

xmlns:tools="http://schemas.android.com/tools"
android:layout_width="match_parent"
android:layout_height="match_parent"
android:background="#ef34ee"
android:paddingBottom="@dimen/activity_vertical_margin"
android:paddingLeft="@dimen/activity_horizontal_margin"
android:paddingRight="@dimen/activity_horizontal_margin"
android:paddingTop="@dimen/activity_vertical_margin"
tools:context=".MainActivity" >

<RelativeLayout
android:layout_width="300dp"
android:layout_height="300dp"
android:background="@drawable/shape_layout"
android:layout_centerHorizontal="true"
android:layout_centerVertical="true" >

<EditText
android:id="@+id/editText1"
android:layout_width="wrap_content"
android:layout_height="wrap_content"
android:layout_alignParentTop="true"
android:layout_centerHorizontal="true"
android:layout_marginTop="80dp"
android:hint="UserName"
android:ems="10" />

<EditText
android:id="@+id/editText2"
android:layout_width="wrap_content"
android:layout_height="wrap_content"
android:layout_alignLeft="@+id/editText1"
android:layout_below="@+id/editText1"
android:layout_marginTop="5dp"
android:hint="Password"
android:ems="10" />

<TextView
android:id="@+id/textView1"
android:layout_width="wrap_content"
android:layout_height="wrap_content"
android:layout_alignParentTop="true"
android:layout_centerHorizontal="true"
android:layout_marginTop="20dp"
android:textColor="#fff"
android:textSize="20sp"
android:textStyle="bold|italic"
android:text="LOGIN" />

<Button
android:id="@+id/button1"
android:layout_width="160dp"
android:layout_height="40dp"
android:layout_below="@+id/editText2"
android:layout_centerHorizontal="true"
android:layout_marginTop="10dp"
android:background="@drawable/buttonshape"
android:textColor="#fff"
android:textSize="16sp"
android:textStyle="bold"
android:text="LogIN" />

</RelativeLayout>


</RelativeLayout>
بعد از اینکه این کار را انجام دادیم به سراغ نوشتن کدهای شیپ(Shape) میرویم.ابتدا یک shape را برای دکمه ی LogIn طراحی می کنیم.ابتدا یک فایل xml در پوشه ی drawable ایجاد کنید و نام آن را buttonshape قرار دهید.
<?xml version="1.0" encoding="utf-8"?>
اگر پوشه ی drawable در زیر مجموعه ی res موجود نمی باشد, بر روی res کلیک راست کرده و گزینه ی NEW را بزنید و در نهایت به folder بروید و نام آن را drawable قرار دهید.
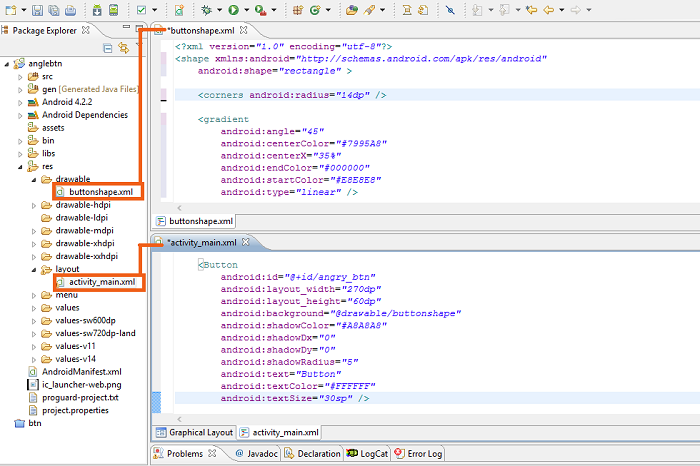
در داخل این فایل از خاصیت corners برای گرد کردن گوشه های دکمه استفاده کردیم،از خاصیت padding برای جمع کردن عناصر از گوشه های دکمه به داخل استفاده کردیم،و در آخر هم از خاصیت stroke برای شیشه ای کردن دکمه استفاده کردیم.
اگر به کدهای فایل main.xml که در اول این آموزش گذاشته شد نگاهی بیاندازید ملاحظه می فرمائید که در قسمت Button تنظیمات backgrand را برابر با آدرس فایل buttonshape قرار داده ایم یعنی backgrand را برابر با همان فایل xml قرار بده که خودمان به صورت shape ایجاد کردیم.
در مرحله ی بعد با استفاده از یک فایل shape ظاهر لیوتی که ایجاد کردیم را اصلاح می کنیم که در این مورد هم در پوشه ی drawable یک فایل xml جدید ایجاد کنید و نام آن را shape_layout قرار دهید .بعد از ایجاد فایل shape آدرس این فایل را مانند قسمت قبل در backgrand قسمت RelatevLayout قرار میدهیم.
<shape xmlns:android="http://schemas.android.com/apk/res/android" android:shape="rectangle" >
<corners
android:radius="20dp"
/>
<solid
android:color="#1da24D"
/>
<stroke
android:width="20dp"
android:color="#f001ff"
/>
</shape>
در داخل این فایل از خاصیت corners برای گرد کردن گوشه های لیوت استفاده کردیم،از خاصیت padding برای جمع کردن عناصر از گوشه های لایه به داخل استفاده کردیم،و در آخر هم از خاصیت stroke برای شیشه ای کردن لایه استفاده کرده ایم که هر چقدر مقدار این بیشتر باشد لایه ی سبز رنگ کوچک تر شده و در نهایت محو می شود.
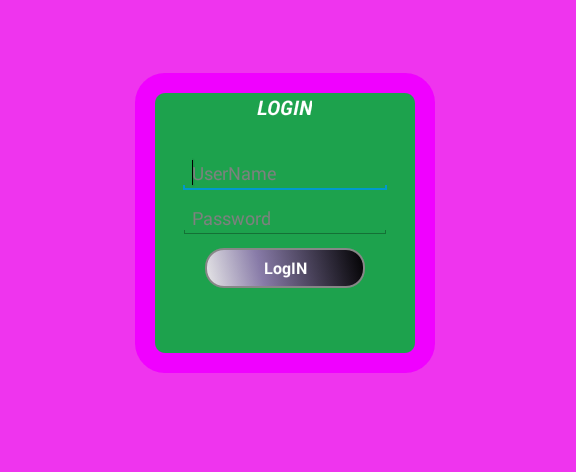
شما می توانید این کار را برای تمامی عناصر موجود در صفحه ای که ایجاد میکنید انجام دهید.تصویری که در زیر نمایش داده شده خروجی این آموزش است.
<RelativeLayout xmlns:android="http://schemas.android.com/apk/res/android"

xmlns:tools="http://schemas.android.com/tools"
android:layout_width="match_parent"
android:layout_height="match_parent"
android:background="#ef34ee"
android:paddingBottom="@dimen/activity_vertical_margin"
android:paddingLeft="@dimen/activity_horizontal_margin"
android:paddingRight="@dimen/activity_horizontal_margin"
android:paddingTop="@dimen/activity_vertical_margin"
tools:context=".MainActivity" >

<RelativeLayout
android:layout_width="300dp"
android:layout_height="300dp"
android:background="@drawable/shape_layout"
android:layout_centerHorizontal="true"
android:layout_centerVertical="true" >

<EditText
android:id="@+id/editText1"
android:layout_width="wrap_content"
android:layout_height="wrap_content"
android:layout_alignParentTop="true"
android:layout_centerHorizontal="true"
android:layout_marginTop="80dp"
android:hint="UserName"
android:ems="10" />

<EditText
android:id="@+id/editText2"
android:layout_width="wrap_content"
android:layout_height="wrap_content"
android:layout_alignLeft="@+id/editText1"
android:layout_below="@+id/editText1"
android:layout_marginTop="5dp"
android:hint="Password"
android:ems="10" />

<TextView
android:id="@+id/textView1"
android:layout_width="wrap_content"
android:layout_height="wrap_content"
android:layout_alignParentTop="true"
android:layout_centerHorizontal="true"
android:layout_marginTop="20dp"
android:textColor="#fff"
android:textSize="20sp"
android:textStyle="bold|italic"
android:text="LOGIN" />

<Button
android:id="@+id/button1"
android:layout_width="160dp"
android:layout_height="40dp"
android:layout_below="@+id/editText2"
android:layout_centerHorizontal="true"
android:layout_marginTop="10dp"
android:background="@drawable/buttonshape"
android:textColor="#fff"
android:textSize="16sp"
android:textStyle="bold"
android:text="LogIN" />

</RelativeLayout>


</RelativeLayout>