آموزش RSS Reader اندروید
RSS مخفف Really Simple Syndication می باشد. RSS راهی ساده برای به اشتراک گذاشتن آپدیت ها و محتوای وب سایت شما با کاربرهای شما می باشد، طوریکه کاربرها مجبور نباشند برای هر آپدیتی، روزانه سایت شما را مشاهده کنند.
مثال RSS
RSS پروندهی می باشد که توسط وب سایت با توسعه ی xml ایجاد می شود. می توانید به راحتی این پرونده را تجزیه کرده و آن را در برنامه ی خود به کاربر نمایش دهید. یک پرونده RSS مانند زیر می باشد.
<rss version="2.0">
<channel>
   <title>Sample RSS</title>
   <link>http://www.google.com</link>
   <description>World's best search engine</description>
</channel>
</rss>
عناصر RSS
یک پرونده RSS مانند آنچه در بالا دیدید، دارای عناصر زیر می باشد.
channel
این عنصر برای توصیف تغذیه ی RSS استفاده می شود.
title
عنوان کانال را تعریف می کند.
link
یک هایپرلینک برای کانال تعریف می کند.
description
کانال را توصیف می کند.
تجزیه ی RSS
تجزیه ی پرونده ی RSS بیشتر شبیه به تجزیه xml می باشد. حال اجازه دهید نگاهی به چگونگی تجزیه ی پرونده XML داشته باشیم.
برای انجام این کار یک شئ XMLPullParser ایجاد خواهیم کرد، اما برای ایجاد آن نیز ابتدا شئ XmlPullParserFactory را ایجاد می کنیم و سپس متد newPullParser() را برای ایجاد XMLPullParser فرا می خوانیم. ترکیب آن مانند زیر می باشد.
private XmlPullParserFactory xmlFactoryObject = XmlPullParserFactory.newInstance();
private XmlPullParser myparser = xmlFactoryObject.newPullParser();
در قسمت بعد فایل دارای XML برای XmlPullParser مشخص می کنیم، که می تواند یک فایل یا یک Stream باشد. در مورد کاری که ما نیاز داریم یک Stream است و ترکیب آن نیز در زیر ارائه شده است.
myparser.setInput(stream,null);
و آخرین گام تجزیه ی XML می باشد. یک فایل xml شامل رویدادها، نام، متن، AttributesValue و غیره می باشد. بنابراین XMLPullParser دارای یک عملکرد مجزا برای تجزیه ی هرکدام از مولفه های فایل xml است. ترکیب آن مانند زیر می باشد
int event = myParser.getEventType();
while (event != XmlPullParser.END_DOCUMENT)
{
   String name=myParser.getName();

   switch (event){
      case XmlPullParser.START_TAG:
      break;

      case XmlPullParser.END_TAG:
      if(name.equals("temperature")){
         temperature = myParser.getAttributeValue(null,"value");
       }
       break;
    }
    event = myParser.next();
}
متد getEventType نوع رویدادی را که اتفاق می افتد، بر میگرداند . به عنوان مثال آغاز Document، آغاز tag و غیره. متد getNameنام برچسب را بر میگرداند و از آنجایی که ما فقط علاقمند به دما هستیم، بنابراین فقط در وضعیت مشروط بررسی می کنیم که اگر برچسب دما گرفتیم، متد getAttributeValueرا فرا بخوانیم تا مقدار مربوط به برچسب دما را به ما گزارش دهد.
علاوه بر این متد ها، متد های دیگری توسط این کلاس برای تجزیه ی بهتر فایل های xml ارائه می شوند. این متد ها در جدول زیر ارائه شده اند.
getAttributeCount()
این متد فقط تعداد ویژگی های start tag کنونی را بر میگرداند .
getAttributeName(int index)
این متد نام ویژگی های مشخص شده توسط شاخص مقدار را بر میگرداند .
getColumnNumber()
این متد گزارش های شماره ی ستون کنونی (شروع از 0) را بر میگرداند .
getDepth()
این متد بازگشت های عمق کنونی عنصر را بر میگرداند .
getLineNumber()
شماره ی خط کنونی را، شروع از 1، بر میگرداند .
getNamespace()
این متد فضانام URI مربوط به عنصر کنونی را بر میگرداند .
getPrefix()
این متد پیشوند عنصر کنونی را بر میگرداند .
getName()
این متد نام برچسب را بر میگرداند .
getText()
این متد متن مربوط به عنصر خاص را بر میگرداند .
isWhitespace()
این متد بررسی می کند که آیا رویداد TEXT کنونی فقط شامل کاراکترهای فضای سفید می شوند.
مثال
این مثال استفاده از کلاس XMLPullParser را توضیح می دهد.
برای آزمایش این مثال می توانید آن را روی یک دستگاه حقیقی یا یک شبیه ساز اجرا کنید.
برای ایجاد یک برنامه ی اندروید از Eclipse IDE استفاده خواهید کرد و آن را با عنوان RSSReader به عنوان بسته ی com.PRG.rssreader نام گذاری کنید. زمان ایجاد این برنامه مطمئن شوید که Target SDKو Compile With در آخرین ورژن Android SDKهستند تا از سطوح بالاتر API استفاده کنید.
فایل src/MainActivity.java را برای افزودن کد لازم تغییر دهید.
res/layout/activity_main را برای افزودن مولفه های XML مربوطه تغییر دهید.
یک فایل جاوای جدید تحت src/HandleXML.java برای تجزیه ی داده ی XML، ایجاد کنید.
یک فایل جاوای جدید تحت src/second.java برای نمایش نتیجه ی XML، ایجاد کنید.
AndroidManifest.xml را برای افزودن اجازه ی اینترنت لازم تغییر دهید.
برنامه را اجرا کنید و یک دستگاه اجرایی اندروید انتخاب کرده و برنامه را روی آن نصب کنید و نتایج را بررسی کنید.
در اینجا محتوای فایل تغییر یافته MainActivity.java را مشاهده می کنید.
package com.PRG.RSSReader;

import android.app.Activity;
import android.content.Intent;
import android.os.Bundle;

import android.view.Menu;
import android.view.MenuItem;
import android.view.MotionEvent;
import android.view.View;

import android.widget.Button;
import android.widget.EditText;
import android.widget.TextView;

import java.util.Set;

public class MainActivity extends Activity {
   EditText title,link,description;
   Button b1,b2;
   private String finalUrl="http://tutorialspoint.com/android/sampleXML.xml";
   private HandleXML obj;

   @Override
   protected void onCreate(Bundle savedInstanceState) {
      super.onCreate(savedInstanceState);
      setContentView(R.layout.activity_main);

      title = (EditText) findViewById(R.id.editText);
      link = (EditText) findViewById(R.id.editText2);
      description = (EditText) findViewById(R.id.editText3);

      b1=(Button)findViewById(R.id.button);
      b2=(Button)findViewById(R.id.button2);
      b1.setOnClickListener(new View.OnClickListener() {
         @Override
         public void onClick(View v) {
            obj = new HandleXML(finalUrl);
            obj.fetchXML();

            while(obj.parsingComplete);
            title.setText(obj.getTitle());
            link.setText(obj.getLink());
            description.setText(obj.getDescription());
         }
      });

      b2.setOnClickListener(new View.OnClickListener() {
         @Override
         public void onClick(View v) {
            Intent in=new Intent(MainActivity.this,second.class);
            startActivity(in);
         }
      });
   }

   @Override
   public boolean onCreateOptionsMenu(Menu menu) {
      // Inflate the menu; this adds items to the action bar if it is present.
      getMenuInflater().inflate(R.menu.menu_main, menu);
      return true;
   }

   @Override
   public boolean onOptionsItemSelected(MenuItem item) {
      // Handle action bar item clicks here. The action bar will
      // automatically handle clicks on the Home/Up button, so long
      // as you specify a parent activity in AndroidManifest.xml.

      int id = item.getItemId();

      //noinspection SimplifiableIfStatement
      if (id == R.id.action_settings) {
         return true;
      }
      return super.onOptionsItemSelected(item);
   }
}
در ادامه محتوای فایل جاوا src/com.PRG.rssreader/HandleXML.javaرا مشاهده می کنید.
package com.PRG.rssreader;

import java.io.InputStream;
import java.net.HttpURLConnection;
import java.net.URL;

import org.xmlpull.v1.XmlPullParser;
import org.xmlpull.v1.XmlPullParserFactory;

import android.util.Log;

public class HandleXML {
   private String title = "title";
   private String link = "link";
   private String description = "description";
   private String urlString = null;
   private XmlPullParserFactory xmlFactoryObject;
   public volatile boolean parsingComplete = true;

   public HandleXML(String url){
      this.urlString = url;
   }

   public String getTitle(){
      return title;
   }

   public String getLink(){
      return link;
   }

   public String getDescription(){
      return description;
   }

   public void parseXMLAndStoreIt(XmlPullParser myParser) {
      int event;
      String text=null;

      try {
         event = myParser.getEventType();

         while (event != XmlPullParser.END_DOCUMENT) {
         String name=myParser.getName();

         switch (event){
            case XmlPullParser.START_TAG:
            break;

            case XmlPullParser.TEXT:
            text = myParser.getText();
            break;

            case XmlPullParser.END_TAG:

            if(name.equals("title")){
               title = text;
            }

            else if(name.equals("link")){
               link = text;
            }

            else if(name.equals("description")){
               description = text;
            }

            else{
            }

            break;
            }

            event = myParser.next();
            }

            parsingComplete = false;
            }

            catch (Exception e) {
               e.printStackTrace();
            }
         }

         public void fetchXML(){
            Thread thread = new Thread(new Runnable(){
               @Override
               public void run() {

               try {
               URL url = new URL(urlString);
               HttpURLConnection conn = (HttpURLConnection) url.openConnection();

               conn.setReadTimeout(10000 /* milliseconds */);
               conn.setConnectTimeout(15000 /* milliseconds */);
               conn.setRequestMethod("GET");
               conn.setDoInput(true);

               // Starts the query
               conn.connect();
               InputStream stream = conn.getInputStream();

               xmlFactoryObject = XmlPullParserFactory.newInstance();
               XmlPullParser myparser = xmlFactoryObject.newPullParser();

               myparser.setFeature(XmlPullParser.FEATURE_PROCESS_NAMESPACES, false);
               myparser.setInput(stream, null);

               parseXMLAndStoreIt(myparser);
               stream.close();
            }

            catch (Exception e) {
            }
         }
      });
      thread.start();
   }
}
یک فایل جاوا در مکان java/second.java بسازید و کدهای آن را به صورت زیر تغییر دهید.
package com.PRG.RSSReader;

import android.app.Activity;
import android.os.Bundle;
import android.webkit.WebView;

/**
 * Created by PRG on 4/6/2015.
 */
public class second extends Activity {
   @Override
   protected void onCreate(Bundle savedInstanceState) {
      super.onCreate(savedInstanceState);
      setContentView(R.layout.second_activity);
      WebView w1=(WebView)findViewById(R.id.webView);
      w1.loadUrl("http://tutorialspoint.com/android/sampleXML.xml");
   }
}
محتوای res/layout/second_main.xmlرا مانند زیر تغییر دهید.
>?xml version="1.0" encoding="utf-8"?>
<LinearLayout xmlns:android="http://schemas.android.com/apk/res/android"
   android:orientation="vertical" android:layout_width="match_parent"
   android:layout_height="match_parent">

   <WebView
      android:layout_width="match_parent"
      android:layout_height="match_parent"
      android:id="@+id/webView"
      android:layout_gravity="center_horizontal" />
</LinearLayout>
محتوای res/layout/activity_main.xmlرا مانند زیر تغییر دهید.
<RelativeLayout xmlns:android="http://schemas.android.com/apk/res/android"
   xmlns:tools="http://schemas.android.com/tools" android:layout_width="match_parent"
   android:layout_height="match_parent" android:paddingLeft="@dimen/activity_horizontal_margin"
   android:paddingRight="@dimen/activity_horizontal_margin"
   android:paddingTop="@dimen/activity_vertical_margin"
   android:paddingBottom="@dimen/activity_vertical_margin"
   tools:context=".MainActivity"
   android:transitionGroup="true">

   <TextView android:text="RSS PRG" android:layout_width="wrap_content"
      android:layout_height="wrap_content"
      android:id="@+id/textview"
      android:textSize="35dp"
      android:layout_alignParentTop="true"
      android:layout_centerHorizontal="true" />

   <TextView
      android:layout_width="wrap_content"
      android:layout_height="wrap_content"
      android:text="Tutorials point"
      android:id="@+id/textView"
      android:layout_below="@+id/textview"
      android:layout_centerHorizontal="true"
      android:textColor="#ff7aff24"
      android:textSize="35dp" />

   <ImageView
      android:layout_width="wrap_content"
      android:layout_height="wrap_content"
      android:id="@+id/imageView"
      android:src="@drawable/abc"
      android:layout_below="@+id/textView"
      android:layout_centerHorizontal="true"
      android:theme="@style/Base.TextAppearance.AppCompat" />

   <EditText
      android:layout_width="wrap_content"
      android:layout_height="wrap_content"
      android:id="@+id/editText"
      android:layout_below="@+id/imageView"
      android:hint="Tittle"
      android:textColorHint="#ff69ff0e"
      android:layout_alignParentRight="true"
      android:layout_alignParentEnd="true"
      android:layout_alignParentLeft="true"
      android:layout_alignParentStart="true" />

   <EditText
      android:layout_width="wrap_content"
      android:layout_height="wrap_content"
      android:id="@+id/editText2"
      android:layout_below="@+id/editText"
      android:layout_alignLeft="@+id/editText"
      android:layout_alignStart="@+id/editText"
      android:textColorHint="#ff21ff11"
      android:hint="Link"
      android:layout_alignRight="@+id/editText"
      android:layout_alignEnd="@+id/editText" />

   <EditText
      android:layout_width="wrap_content"
      android:layout_height="wrap_content"
      android:id="@+id/editText3"
      android:layout_below="@+id/editText2"
      android:layout_alignLeft="@+id/editText2"
      android:layout_alignStart="@+id/editText2"
      android:hint="Description"
      android:textColorHint="#ff33ff20"
      android:layout_alignRight="@+id/editText2"
      android:layout_alignEnd="@+id/editText2" />

   <Button
      android:layout_width="wrap_content"
      android:layout_height="wrap_content"
      android:text="Fetch"
      android:id="@+id/button"
      android:layout_below="@+id/editText3"
      android:layout_alignParentLeft="true"
      android:layout_alignParentStart="true"
      android:layout_toLeftOf="@+id/imageView"
      android:layout_toStartOf="@+id/imageView" />

   <Button
      android:layout_width="wrap_content"
      android:layout_height="wrap_content"
      android:text="Result"
      android:id="@+id/button2"
      android:layout_alignTop="@+id/button"
      android:layout_alignRight="@+id/editText3"
      android:layout_alignEnd="@+id/editText3" />

</RelativeLayout>
res/values/string.xmlرا مانند زیر تغییر دهید.
<resources>
   <string name="app_name">RSSReader</string>
   <string name="hello_world">Hello world!</string>
   <string name="action_settings">Settings</string>
</resources>
این پیش فرض فایل AndroidManifest.xml می باشد.
<?xml version="1.0" encoding="utf-8"?>
<manifest xmlns:android="http://schemas.android.com/apk/res/android"
   package="com.PRG.RSSReader" >
   <uses-permission android:name="android.permission.INTERNET"/>

   <application
      android:allowBackup="true"
      android:icon="@mipmap/ic_launcher"
      android:label="@string/app_name"
      android:theme="@style/AppTheme" >

      <activity
         android:name=".MainActivity"
         android:label="@string/app_name" >

         <intent-filter>
            <action android:name="android.intent.action.MAIN" />
            <category android:name="android.intent.category.LAUNCHER" />
         </intent-filter>

      </activity>

   <activity android:name=".second"></activity>
</application>
</manifest>
اجازه دهید برنامه ی RSSReader تازه تغییریافته را اجرا کنیم.فرض می کنیم که شما در هنگام انجام تنظیمان محیط AVD خود را ایجاد کرده اید. برای اجرای برنامه از Eclipse، یکی از فایل های فعالیت برنامه را باز کرده و روی آیکن icon در تولبار کلیک کنید.

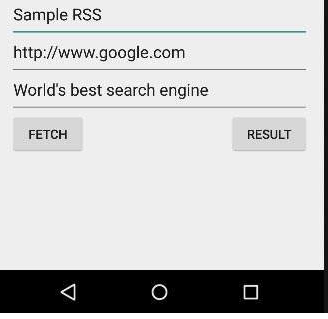
اکنون روی دکمه ی Fetch Feed بزنید تا RSS feed را بیاورید، پس از آن صفحه ی زیر نمایش داده خواهد شد که داده ی RSS را نمایش می دهد.

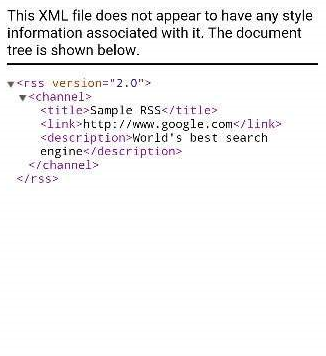
در قسمت بعد برای دیدن xml روی result کلیک کنید.


