آموزش بهترین روش ها دراندروید
روش هایی وجود دارند که درهنگام توسعه ی برنامه ی اندروید می توانید دنبال کنید. این تمرینها توسط خود اندروید پیشنهاد داده می شوند و با توجه به زمان ارتقا می یابند.
این روش ها شامل واکنش ویژگی های طرح، اجرا، امنیت، امور شخصی، سازگاری، تست کردن و نکات مربوط به انتشار و رسمیت پولی بخشیدن می شود. آنها در زیر لیست شده اند.
بهترین روش ها-User input
هر فیلد متن برای کار خاصی در نظر گرفته شده است. به عنوان مثال برخی از این فیلدها برای متن و برخی برای اعداد هستند. در هنگام تمرکز بر روی آن تکست فیلد، اگر مربوط به اعداد است که بهتر است صفحه کلید عدد نمایش داده شود. ترکیب آن در زیر ارائه شده است .
EditText
   android:layout_width="wrap_content"
   android:layout_height="wrap_content"
   android:id="@+id/editText"
   android:layout_alignParentRight="true"
   android:layout_alignParentEnd="true"
   android:hint="User Name"
   android:layout_below="@+id/imageView"
   android:layout_alignLeft="@+id/imageView"
   android:layout_alignStart="@+id/imageView"
   android:numeric="integer" />
در غیر این صورت اگر مربوط به پسورد می باشد، پس باید نمای پسورد نشان دهد طوری که کاربر بتواند به راحتی پسورد را به خاطر بسپارد. ترکیب آن مانند زیر می باشد .
<EditText
   android:layout_width="wrap_content"
   android:layout_height="wrap_content"
   android:id="@+id/editText2"
   android:layout_alignLeft="@+id/editText"
   android:layout_alignStart="@+id/editText"
   android:hint="Pass Word"
   android:layout_below="@+id/editText"
   android:layout_alignRight="@+id/editText"
   android:layout_alignEnd="@+id/editText"
   android:password="true" />
بهترین روش ها- Background
کارهای مشخصی در یک برنامه وجود دارند که در پس زمینه ی آن در حال اجرا هستند. این کارها عبارتند از گرفتن فایل از اینترنت، اجرای موسیقی، و غیره باشد. پیشنهاد می شود که کارهایی که مدت طولانی در حال انتظار بوده اند، نباید با رشته ی UI انجام شوند بلکه بهتر است در پس زمینه توسط سرویس ها یا AsyncTask. انجام شوند.
AsyncTaskدر مقایسه با سرویس ها
هردو برای انجام فعالیت های پس زمینه استفاده می شوند اما سرویس تحت تاثیر بسیاری از رویدادهای دوره ی کار اینترفیس کاربر قرار نمی گیرد، بنابراین به اجرا در محیط هایی ادامه می دهد که یک AsyncTask را می بندند.
بهترین روش ها- عملکرد
زمانی که دستگاه شما به یک منبع نیرو یا شارژ متصل است، باید در انتهای پشتی نه در انتهای جلویی، به طور متفاوت برنامه را اجرا کند. شارژممکن است از طریق USB یا از طریق کابل سیم انجام شود.
زمانی که دستگاه شما در حال شارژ کردن خود می باشد، پیشنهاد می شود که تنظیمات برنامه ی خود را آپدیت کنید، اگر برنامه ای باشد مانند به حداکثر رساندن میزان Refresh کردن در هنگام اتصال دستگاه. این کار می تواند به این شکل انجام شود.
IntentFilter ifilter = new IntentFilter(Intent.ACTION_BATTERY_CHANGED);
Intent batteryStatus = context.registerReceiver(null, ifilter);

// Are we charging / charged? Full or charging.
int status = batteryStatus.getIntExtra(BatteryManager.EXTRA_STATUS, -1);

// How are we charging? From AC or USB.
int chargePlug = batteryStatus.getIntExtra(BatteryManager.EXTRA_PLUGGED, -1);
بهترین روش ها- امنیت و خصوصی سازی
بسیار مهم است که برنامه ی شما دارای امنیت باشد، و نه تنها برنامه بلکه داده ی کاربر و داده ی برنامه هم باید دارای این امنیت باشند. امنیت با دنبال کردن فاکتورهای زیر افزایش می یابد.
1) از حافظه ی داخلی به جای حافظه ی خارجی برای ذخیره ی فایل های برنامه ها استفاده کنید.
2) هر جا ممکن است از تامین کننده ی محتوا استفاده کنید.
3) در هنگام اتصال به وب از SSI استفاده کنید.
4) از مجوزهای موجود برای دسترسی به کاربردهای مختلف برنامه ها استفاده کنید.
مثال
مثال زیر برخی از تمرینات برتری را توضیح می دهد که شما باید در زمان توسعه ی برنامه ی اندروید دنبال کنید. در این مثال یک برنامه ی پایه ایجاد می شود که به شما اجازه می دهد تا تعیین کنید که چگونه از فیلدهای متن استفاده کنید و چگونه اجرا را به وسیله ی کنترل شارژ تلفن افزایش دهید.
برای آزمایش این مثال لازم است آن را روی دستگاه اندروید اجرا کنید.
- شما برای ایجاد یک برنامه ی اندروید از Eclipse IDE استفاده خواهید کرد و آن را با عنوان BestPractices تحت بسته ی com.example.autocomplete نام گذاری می کنید. در هنگام ایجاد این پروژه مطمئن شوید که Target SDK و Compile With در آخرین ورژن اندروید SDK می باشند تا از سطوح بالاتر API ها استفاده کنید.
- فایل src/MainActivity.java را برای افزودن کد، تغییر دهید.
- لی اوت فایل XML مربوط به res/layout/activity_main.xml را تغییر دهید و اگر لازم است مولفه ی GUI اضافه کنید.
- برنامه را اجرا کنید و یک دستگاه اجرایی اندروید انتخاب کنید و برنامه را روی آن نصب کنید و نتایج را بررسی کنید.
در اینجا محتوای MainActivity.javaرا مشاهده می کنید.
package com.example.sairamkrishna.myapplication;

import android.bluetooth.BluetoothAdapter;
import android.bluetooth.BluetoothDevice;

import android.content.DialogInterface;
import android.content.Intent;
import android.content.IntentFilter;

import android.os.BatteryManager;
import android.support.v7.app.ActionBarActivity;
import android.os.Bundle;

import android.view.Menu;
import android.view.MenuItem;
import android.view.View;

import android.widget.ArrayAdapter;
import android.widget.Button;
import android.widget.EditText;
import android.widget.ListView;
import android.widget.TextView;
import android.widget.Toast;

import java.util.ArrayList;
import java.util.Set;

public class MainActivity extends ActionBarActivity {
   EditText ed1,ed2;
   Button b1;

   @Override
   protected void onCreate(Bundle savedInstanceState) {
      super.onCreate(savedInstanceState);
      setContentView(R.layout.activity_main);

      ed1=(EditText)findViewById(R.id.editText);
      ed2=(EditText)findViewById(R.id.editText2);
      b1=(Button)findViewById(R.id.button);

      b1.setOnClickListener(new View.OnClickListener() {
         @Override
         public void onClick(View v) {
            IntentFilter ifilter = new IntentFilter(Intent.ACTION_BATTERY_CHANGED);
            Intent batteryStatus = registerReceiver(null, ifilter);

            int status = batteryStatus.getIntExtra(BatteryManager.EXTRA_STATUS, -1);
            boolean isCharging = status == BatteryManager.BATTERY_STATUS_CHARGING ||
            status == BatteryManager.BATTERY_STATUS_FULL;

            int chargePlug = batteryStatus.getIntExtra(BatteryManager.EXTRA_PLUGGED,-1);
            boolean usbCharge = chargePlug == BatteryManager.BATTERY_PLUGGED_USB;
            boolean acCharge = chargePlug == BatteryManager.BATTERY_PLUGGED_AC;

            if(usbCharge){
               Toast.makeText(getApplicationContext(),"Mobile is charging on USB",Toast.LENGTH_LONG).show();
            }
            else
            {
               Toast.makeText(getApplicationContext(),"Mobile is charging on AC",Toast.LENGTH_LONG).show();
            }
         }
      });
   }

   @Override
   protected void onDestroy() {
      super.onDestroy();
   }

   @Override
   public boolean onCreateOptionsMenu(Menu menu) {
      // Inflate the menu; this adds items to the action bar if it is present.
      getMenuInflater().inflate(R.menu.menu_main, menu);
      return true;
   }

   @Override
   public boolean onOptionsItemSelected(MenuItem item) {
      // Handle action bar item clicks here. The action bar will
      // automatically handle clicks on the Home/Up button, so long
      // as you specify a parent activity in AndroidManifest.xml.

      int id = item.getItemId();

      //noinspection SimplifiableIfStatement
      if (id == R.id.action_settings) {
         return true;
      }
      return super.onOptionsItemSelected(item);
   }
}
در اینجا محتوای فایل activity_main.xmlرا مشاهده می کنید.
<RelativeLayout xmlns:android="http://schemas.android.com/apk/res/android"
xmlns:tools="http://schemas.android.com/tools" android:layout_width="match_parent"
android:layout_height="match_parent" android:paddingLeft="@dimen/activity_horizontal_margin"
android:paddingRight="@dimen/activity_horizontal_margin"
android:paddingTop="@dimen/activity_vertical_margin"
android:paddingBottom="@dimen/activity_vertical_margin" tools:context=".MainActivity">
<TextView android:text="Bluetooth Example" android:layout_width="wrap_content"
android:layout_height="wrap_content"
android:id="@+id/textview"
android:textSize="35dp"
android:layout_alignParentTop="true"
android:layout_centerHorizontal="true" />
<TextView
android:layout_width="wrap_content"
android:layout_height="wrap_content"
android:text="Tutorials point"
android:id="@+id/textView"
android:layout_below="@+id/textview"
android:layout_centerHorizontal="true"
android:textColor="#ff7aff24"
android:textSize="35dp" />
<ImageView
android:layout_width="wrap_content"
android:layout_height="wrap_content"
android:id="@+id/imageView"
android:src="@drawable/abc"
android:layout_below="@+id/textView"
android:layout_centerHorizontal="true" />
<EditText
android:layout_width="wrap_content"
android:layout_height="wrap_content"
android:id="@+id/editText"
android:layout_alignParentRight="true"
android:layout_alignParentEnd="true"
android:hint="User Name"
android:layout_below="@+id/imageView"
android:layout_alignLeft="@+id/imageView"
android:layout_alignStart="@+id/imageView"
android:numeric="integer" />
<EditText
android:layout_width="wrap_content"
android:layout_height="wrap_content"
android:id="@+id/editText2"
android:layout_alignLeft="@+id/editText"
android:layout_alignStart="@+id/editText"
android:hint="Pass Word"
android:layout_below="@+id/editText"
android:layout_alignRight="@+id/editText"
android:layout_alignEnd="@+id/editText"
android:password="true" />
<Button
android:layout_width="wrap_content"
android:layout_height="wrap_content"
android:text="Check"
android:id="@+id/button"
android:layout_below="@+id/editText2"
android:layout_centerHorizontal="true" />
</RelativeLayout>
در اینجا محتوای Strings.xmlرا مشاهده می کنید.
<resources>
<string name="app_name">My Application</string>
<string name="hello_world">Hello world!</string>
<string name="action_settings">Settings</string>
</resources>
در اینجا محتوای AndroidManifest.xml را مشاهده می کنید.
<?xml version="1.0" encoding="utf-8"?>
<manifest xmlns:android="http://schemas.android.com/apk/res/android"
   package="com.example.bestpractices"
   android:versionCode="1"
   android:versionName="1.0" >

   <application
      android:allowBackup="true"
      android:icon="@drawable/ic_launcher"
      android:label="@string/app_name"
      android:theme="@style/AppTheme" >

      <activity
         android:name="com.example.bestpractices.MainActivity"
         android:label="@string/app_name" >

         <intent-filter>
            <action android:name="android.intent.action.MAIN" />
            <category android:name="android.intent.category.LAUNCHER" />
         </intent-filter>

      </activity>

   </application>
</manifest>
اجازه بدهید برنامه ی BestPracticesشما را اجرا کنیم. فرض می کنیم که دستگاه موبایل اندروید خود را به کامپیوتر متصل کرده اید. برای اجرای برنامه از Eclipse، یکی ازفایل های فعالیت پروژه را باز کرده و روی آیکن Run از تولبار کلیک کنید.
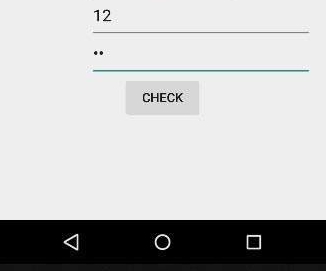
تصویر بالا خروجی برنامه را نشان می دهد.
اکنون روی فیلد Username تایپ کنید، و شما پیشنهادات داخلی اندروید را مشاهده می کنید که از دیکشنری می آیند.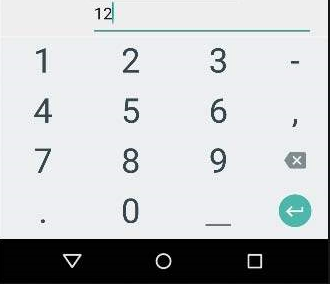
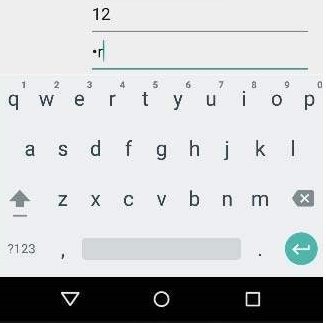
حال شما اشاره گر را در فیلد پسورد مشاهده می کنید که به محض اینکه آغاز به نوشتن کنید، ناپدید می شود. این امر در زیر نمایش داده شده است.
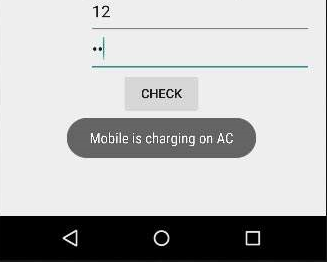
در انتها دستگاه خود را به کابل AC یا کابل USB متصل کنید و دکمه ی Charging check را فشار دهید. من دستگاه خود را از طریق یک کابل USB به یک کامپیوتر متصل می کنم که پیغام آن در زیر نمایش داده شده است.