آموزش ارسال SMS در اندروید
در اندروید شما می توانید از API SmsManager یا برنامه های داخلی sms در دستگاه های ساخته شده استفاده کنید.
در این آموزش ما به شما دو نمونه اولیه ارسال پیام کوتاه را نمایش می دهیم.
استفاده از SmsManager API
SmsManager smsManager = SmsManager.getDefault();
smsManager.sendTextMessage("phoneNo", null, "sms message", null, null);
ساخت برنامه ی داخلی sms
Intent sendIntent = new Intent(Intent.ACTION_VIEW);
sendIntent.putExtra("sms_body", "default content");
sendIntent.setType("vnd.android-dir/mms-sms");
startActivity(sendIntent);
البته هر دو به مجوز ارسال sms نیاز دارند:
<uses-permission android:name="android.permission.SEND_SMS" />
علاوه بر متد بالا، عملکردهای مهم دیگری در کلاس Sms Manager وجود دارند که لیست آنها را در زیر مشاهده می کنند:
ArrayList<String> divideMessage(String text)
این روش یک متن پیام را به چندین بخش تقسیم می کند، هیچ کدام بزرگتر ازاندازه ی بزرگترین پیام متنی نیستند.static SmsManager getDefault()
این روش برای به دست آوردن نمونه ی پیش فرض SmsManager استفاده می شود.
void sendDataMessage(String destinationAddress, String scAddress, short destinationPort, byte[] data, PendingIntent sentIntent, PendingIntent deliveryIntent)
این روش برای ارسال پایگاه داده ی SMS به پورت یک برنامه ی مشخص استفاده می شود.
void sendMultipartTextMessage(String destinationAddress, String scAddress, ArrayList<String> parts, ArrayList<PendingIntent> sentIntents, ArrayList<PendingIntent> deliveryIntents)
یک متن چند بخشی SMS محور را ارسال می کند.
void sendTextMessage(String destinationAddress, String scAddress, String text, PendingIntent sentIntent, PendingIntent deliveryIntent)
یک متن SMS محور را ارسال می کند.
مثال
این مثال به طور عملی به شما نشان می دهد چگونه از شئ SmsManager برای ارسال یک sms به شماره موبایل ارائه شده ارسال کنید.
برای امتحان این مثال به یک دستگاه موبایل مجهز شده به آخرین ورژن Android OS نیاز خواهید داشت، در غیر این صورت مجبور خواهید بود با شبیه ساز کار کنید که ممکن است به درستی کار نکند.
برای ایجاد یک برنامه ی اندروید از Eclipse IDE استفاده خواهید کرد و آن را با عنوان sms تحت بسته ی com.example.sms نام گذاری کنید. زمان ایجاد این برنامه مطمئن شوید که Target SDKو Compile With در آخرین ورژن Android SDKهستند تا از سطوح بالاتر API استفاده کنید.
فایل src/MainActivity.java را تغییر دهید و کد لازم برای مراقبت از ارسال ایمیل اضافه کنید.
لی اوت فایل XML مربوط به res/layout/activity_main.xml را تغییر داده و اگر لازم است مولفه ی GUI را به آن اضافه کنید. برای گرفتن شماره موبایل و متن SMS ارسالی یک GUI ساده و یک دکمه برای ارسال SMS اضافه می کنم.
res/values/strings.xmlرا تغییر دهید تا مقادیر ثابت لازم را تعریف کنید.
AndroidManifest.xmlرا به شکلی که در زیر می بینید تغییر دهید.
برنامه را اجرا کنید و شبیه ساز Android را آغاز کنید و نتیجه ی تغییرات انجام شده بر روی برنامه را بررسی کنید.
در زیر محتوای تغییر یافته ی فایل MainActivity.java را مشاهده می کنید.
package com.example.sms;

import android.os.Bundle;
import android.app.Activity;
import android.telephony.SmsManager;
import android.util.Log;
import android.view.Menu;
import android.view.View;
import android.widget.Button;
import android.widget.EditText;
import android.widget.Toast;

public class MainActivity extends Activity {
   Button sendBtn;
   EditText txtphoneNo;
   EditText txtMessage;

   @Override
   protected void onCreate(Bundle savedInstanceState) {
      super.onCreate(savedInstanceState);
      setContentView(R.layout.activity_main);

      sendBtn = (Button) findViewById(R.id.btnSendSMS);
      txtphoneNo = (EditText) findViewById(R.id.editText);
      txtMessage = (EditText) findViewById(R.id.editText2);

      sendBtn.setOnClickListener(new View.OnClickListener() {
         public void onClick(View view) {
            sendSMSMessage();
         }
      });
   }
   protected void sendSMSMessage() {
      Log.i("Send SMS", "");
      String phoneNo = txtphoneNo.getText().toString();
      String message = txtMessage.getText().toString();

      try {
         SmsManager smsManager = SmsManager.getDefault();
         smsManager.sendTextMessage(phoneNo, null, message, null, null);
         Toast.makeText(getApplicationContext(), "SMS sent.", Toast.LENGTH_LONG).show();
      }

      catch (Exception e) {
         Toast.makeText(getApplicationContext(), "SMS faild, please try again.", Toast.LENGTH_LONG).show();
         e.printStackTrace();
      }
   }

   @Override
   public boolean onCreateOptionsMenu(Menu menu) {
      // Inflate the menu; this adds items to the action bar if it is present.
      getMenuInflater().inflate(R.menu.main, menu);
      return true;
   }
}
کد زیر محتوای فایل res/layout/activity_main.xml خواهد بود.
<RelativeLayout xmlns:android="http://schemas.android.com/apk/res/android"
   xmlns:tools="http://schemas.android.com/tools"
   android:layout_width="match_parent"
   android:layout_height="match_parent"
   android:paddingBottom="@dimen/activity_vertical_margin"
   android:paddingLeft="@dimen/activity_horizontal_margin"
   android:paddingRight="@dimen/activity_horizontal_margin"
   android:paddingTop="@dimen/activity_vertical_margin"
   tools:context="MainActivity">

   <TextView
      android:id="@+id/textView1"
      android:layout_width="wrap_content"
      android:layout_height="wrap_content"
      android:text="Sending SMS Example"
      android:layout_alignParentTop="true"
      android:layout_centerHorizontal="true"
      android:textSize="30dp" />

   <TextView
      android:id="@+id/textView2"
      android:layout_width="wrap_content"
      android:layout_height="wrap_content"
      android:text="Tutorials point "
      android:textColor="#ff87ff09"
      android:textSize="30dp"
      android:layout_below="@+id/textView1"
      android:layout_alignRight="@+id/imageButton"
      android:layout_alignEnd="@+id/imageButton" />

   <ImageButton
      android:layout_width="wrap_content"
      android:layout_height="wrap_content"
      android:id="@+id/imageButton"
      android:src="@drawable/abc"
      android:layout_below="@+id/textView2"
      android:layout_centerHorizontal="true" />

   <EditText
      android:layout_width="wrap_content"
      android:layout_height="wrap_content"
      android:id="@+id/editText"
      android:hint="Enter Phone Number"
      android:phoneNumber="true"
      android:textColorHint="@color/abc_primary_text_material_dark"
      android:layout_below="@+id/imageButton"
      android:layout_centerHorizontal="true" />

   <EditText
      android:layout_width="wrap_content"
      android:layout_height="wrap_content"
      android:id="@+id/editText2"
      android:layout_below="@+id/editText"
      android:layout_alignLeft="@+id/editText"
      android:layout_alignStart="@+id/editText"
      android:textColorHint="@color/abc_primary_text_material_dark"
      android:layout_alignRight="@+id/imageButton"
      android:layout_alignEnd="@+id/imageButton"
      android:hint="Enter SMS" />

   <Button
      android:layout_width="wrap_content"
      android:layout_height="wrap_content"
      android:text="Send Sms"
      android:id="@+id/btnSendSMS"
      android:layout_below="@+id/editText2"
      android:layout_centerHorizontal="true"
      android:layout_marginTop="48dp" />

</RelativeLayout>
کد زیر محتوای فایل res/values/strings.xml برای تعریف دو ثابت جدید می باشد.
<?xml version="1.0" encoding="utf-8"?>
<resources>
   <string name="app_name">sms</string>
   <string name="action_settings">Settings</string>
</resources>
در زیر محتوای پیش فرض AndroidManifest.xmlرا مشاهده می کنید.
<?xml version="1.0" encoding="utf-8"?>
<manifest xmlns:android="http://schemas.android.com/apk/res/android"
   package="com.example.sms"
   android:versionCode="1"
   android:versionName="1.0" >

   <uses-sdk
      android:minSdkVersion="8"
      android:targetSdkVersion="22" />
   <uses-permission android:name="android.permission.SEND_SMS" />

   <application
      android:allowBackup="true"
      android:icon="@drawable/ic_launcher"
      android:label="@string/app_name"
      android:theme="@style/AppTheme" >

      <activity
         android:name="com.example.sms.MainActivity"
         android:label="@string/app_name" >

         <intent-filter>
            <action android:name="android.intent.action.MAIN" />
            <category android:name="android.intent.category.LAUNCHER" />
         </intent-filter>

      </activity>

   </application>
</manifest>
اجازه بدهید برنامه ی sms شما را اجرا کنیم. فرض می کنیم که دستگاه موبایل اندروید خود را به کامپیوتر متصل کرده اید. برای اجرای برنامه از Eclipse، یکی ازفایل های فعالیت پروژه را باز کرده و روی آیکن Run از تولبار کلیک کنید.
موبایل خود را به عنوان یک گزینه انتخاب کنید و سپس آن را بررسی کنید که صفحه ی زیر را نمایش خواهد داد.
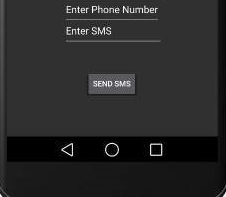
اکنون می توانید شماره موبایل دلخواه خود را انتخاب کرده و یک پیام متنی به آن شماره ارسال کنید. در انتها برای ارسال پیام خود روی دکمه ی Send SMS کلیک کنید. مطمئن شوید که اتصال GSM شما خوب کار میکند تا پیامتان به گیرنده تحویل داده شود.
شما می توانید تعدادی SMS را که توسط کاما مجزا شده اند را بگیرید و سپس مجبور خواهید بود در برنامه ی خود آنها را به یک رشته array تجزیه کنید و در انتها می توانید از یک حلقه استفاده کنید تا پیام خود را به تمام شماره های داده شده ارسال کنید. و اینگونه است که شما می توانید کاربر SMS خود را بنویسید. بخش بعدی به شما نشان خواهد داد که چگونه از کاربر SMS درحال کار برای ارسال SMS استفاده کنید.
استفاده از Intent داخلی برای ارسال SMS
شما می توانید از Android Intent برای ارسال SMS با فرخوانی کارکردگرایی SMS داخلی اندروید استفاده کنید. بخش بعدی قسمت های مختلف Intent object لازم برای ارسال SMS را توضیح می دهد.
فعالیت Intent Object برای ارسال SMS
شما می توانید از فعالیت ACTION_VIEW برای راه اندازی یک sms client نصب شده روی دستگاه اندروید خود استفاده کنید. در زیر ترکیب ساده ی ایجاد یک Intent را با فعالیت ACTION_VIEW مشاهده می کنید.
Intent smsIntent = new Intent(Intent.ACTION_VIEW);
شئ اینتنت-نوع /داده برای ارسال SMS
برای ارسال یک SMS شما نیاز دارید تا smsto:را مشخص کنید، و به عنوان یک URI از متد setData() استفاده کنید و نوع داده برای vnd.android-dir/mms-sms از متد setType() مانند زیر استفاده خواهد کرد.
smsIntent.setData(Uri.parse("smsto:"));
smsIntent.setType("vnd.android-dir/mms-sms");
Intent object- افزوده برای ارسال SMS
اندروید دارای یک پشتیبانی داخلی برای افزودن شماره تلفن و پیام متنی برای ارسال SMS می باشد که مانند زیر است.
smsIntent.putExtra("address"  , new String("0123456789;3393993300"));
smsIntent.putExtra("sms_body"  , "Test SMS to Angilla");
در اینجا address و sms_body به حروف کوچک و بزرگ حساس بوده و فقط باید در کاراکترهای کوچک نوشته شوند. شما می توانید بیشتر از یک شماره را در رشته مشخص کنید و آنها را با علامت (;) یا سمی کولون مجزا کنید.
مثال
مثال زیر در عمل برای شما توضیح می دهد که چگونه از Intent object برای آغازکاربر sms در ارسال sms به شماره های داده شده، استفاده کنید. برای ا جرای این مثال به یک دستگاه موبایل مجهز شده به آخرین ورژن Android OS نیاز خواهید داشت، در غیر این صورت مجبور به استفاده ازمقلدی خواهید شد که ممکن است به خوبی کار نکند.
شما از Eclipse IDE برای ایجاد یک برنامه ی اندروید استفاده خواهید کرد و آن را با عنوان SendSMSDemo تحت پکیج com.example.sendsmsdemo نام گذاری خواهید کرد. در هنگام ایجاد این پروژه،مطمئن شوید که Target SDK و Compile With در آخرین ورژن از اندروید SDK هستند تا از سطوح بالاتر API استفاده کنید.
فایل src/MainActivity.javaرا تغییر دهید و کد لازم برای مراقبت از ارسال sms را اضافه کنید.
لی اوت فایل XML مربوط به res/layout/activity_main.xmlرا تغییر دهید و اگر لازم است مولفه ی GUI به آن اضافه کنید. من در حال افزودن یک دکمه ی ساده برای آغار SMS Client می باشم
res/values/strings.xmlرا برای تعریف مقادیر ثابت لازم تغییر دهید.
AndroidManifest.xml همانطور که در زیر نمایش داده شده، تغییر دهید.
- برنامه را اجرا کنید تا مقلد اندروید آغاز شود و نتیجه ی تغییرات انجام شده در برنامه را بررسی کنید.
در زیر محتوای تغییر یافته ی فایل MainActivity.java را مشاهده می کنید.
package com.example.sms;

import android.net.Uri;
import android.os.Bundle;
import android.app.Activity;
import android.content.Intent;
import android.util.Log;
import android.view.Menu;
import android.view.View;
import android.widget.Button;
import android.widget.Toast;

public class MainActivity extends Activity {
   @Override
   protected void onCreate(Bundle savedInstanceState) {
      super.onCreate(savedInstanceState);
      setContentView(R.layout.activity_main);

      Button startBtn = (Button) findViewById(R.id.button);
      startBtn.setOnClickListener(new View.OnClickListener() {
         public void onClick(View view) {
            sendSMS();
         }
      });
   }

   protected void sendSMS() {
      Log.i("Send SMS", "");
      Intent smsIntent = new Intent(Intent.ACTION_VIEW);

      smsIntent.setData(Uri.parse("smsto:"));
      smsIntent.setType("vnd.android-dir/mms-sms");
      smsIntent.putExtra("address"  , new String ("01234"));
      smsIntent.putExtra("sms_body"  , "Test ");

      try {
         startActivity(smsIntent);
         finish();
         Log.i("Finished sending SMS...", "");
      }
      catch (android.content.ActivityNotFoundException ex) {
         Toast.makeText(MainActivity.this,
         "SMS faild, please try again later.", Toast.LENGTH_SHORT).show();
      }
   }

   @Override
   public boolean onCreateOptionsMenu(Menu menu) {
      // Inflate the menu; this adds items to the action bar if it is present.
      getMenuInflater().inflate(R.menu.main, menu);
      return true;
   }
}
در ادامه محتوای فایل res/layout/activity_main.xml خواهد بود.
<RelativeLayout xmlns:android="http://schemas.android.com/apk/res/android"
   xmlns:tools="http://schemas.android.com/tools"
   android:layout_width="match_parent"
   android:layout_height="match_parent"
   android:paddingLeft="@dimen/activity_horizontal_margin"
   android:paddingRight="@dimen/activity_horizontal_margin"
   android:paddingTop="@dimen/activity_vertical_margin"
   android:paddingBottom="@dimen/activity_vertical_margin"
   tools:context=".MainActivity">

   <TextView
      android:layout_width="wrap_content"
      android:layout_height="wrap_content"
      android:text="Drag and Drop Example"
      android:id="@+id/textView"
      android:layout_alignParentTop="true"
      android:layout_centerHorizontal="true"
      android:textSize="30dp" />

   <TextView
      android:layout_width="wrap_content"
      android:layout_height="wrap_content"
      android:text="Tutorials Point "
      android:id="@+id/textView2"
      android:layout_below="@+id/textView"
      android:layout_centerHorizontal="true"
      android:textSize="30dp"
      android:textColor="#ff14be3c" />

   <ImageView
      android:layout_width="wrap_content"
      android:layout_height="wrap_content"
      android:id="@+id/imageView"
      android:src="@drawable/abc"
      android:layout_marginTop="48dp"
      android:layout_below="@+id/textView2"
      android:layout_centerHorizontal="true" />

   <Button
      android:layout_width="wrap_content"
      android:layout_height="wrap_content"
      android:text="Compose SMS"
      android:id="@+id/button"
      android:layout_below="@+id/imageView"
      android:layout_alignRight="@+id/textView2"
      android:layout_alignEnd="@+id/textView2"
      android:layout_marginTop="54dp"
      android:layout_alignLeft="@+id/imageView"
      android:layout_alignStart="@+id/imageView" />

</RelativeLayout>
در ادامه محتوای res/values/strings.xml برای تعریف دو ثابت جدید خواهد بود.
<?xml version="1.0" encoding="utf-8"?>
<resources>
   <string name="app_name">tutorialspoint</string>
   <string name="action_settings">Settings</string>
</resources>
در ادامه محتوای پیش فرض فایل AndroidManifest.xml را مشاهده خواهید کرد.
<?xml version="1.0" encoding="utf-8"?>
<manifest xmlns:android="http://schemas.android.com/apk/res/android"
   package="com.example.sms"
   android:versionCode="1"
   android:versionName="1.0" >

   <uses-sdk
      android:minSdkVersion="8"
      android:targetSdkVersion="22" />

   <application
      android:allowBackup="true"
      android:icon="@drawable/ic_launcher"
      android:label="@string/app_name"
      android:theme="@style/AppTheme" >

      <activity
         android:name="com.example.sms.MainActivity"
         android:label="@string/app_name" >

         <intent-filter>
            <action android:name="android.intent.action.MAIN" />
            <category android:name="android.intent.category.LAUNCHER" />
         </intent-filter>

      </activity>

   </application>
</manifest>
اجازه بدهید برنامه ی sms را اجرا کنیم. فرض می کنیم که موبایل اندروید خود را به کامپیوتر متصل کرده اید. برای اجرای برنامه از Eclipse یکی از فایل های فعالیت پروژه ی خود را باز کنید و روی آیکن Run از تولبار کلیک کنید.
موبایل خود را به عنوان یک گزینه انتخاب کنید و سپس آن را چک کنید که صفحه ی زیر را نمایش خواهد داد:
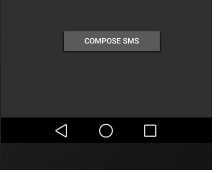
اکنون دکمه ی Compose SMS را برای آغاز کاربرهای داخلی SMS کلیک کنید که در زیر نمایش داده شده است.
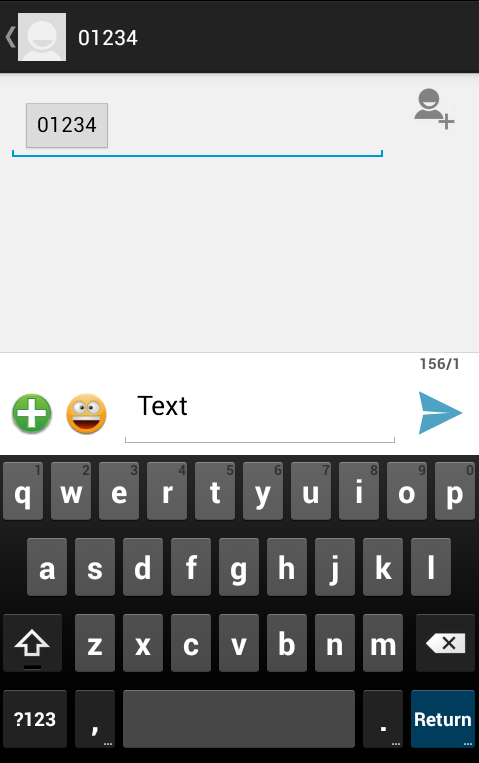
شما می توانید هر کدام از فیلدهای پیش فرض ارائه شده را تغییر دهید و در انتها از دکمه ی send SMS استفاده کنید و sms خود را به گیرنده های ذکر شده ارسال کنید.