آموزش بررسی کننده ی املائی اندروید
پلتفرم اندروید یک بررسی کننده ی املا ارائه می دهد که به شما اجازه می دهد که به بررسی کردن املا در برنامه ی خود دسترسی داشته و آن را اجرا کنید.
برای استفاده از این بررسی کننده لازم است تا اینترفیس آن را SpellCheckerSessionListener را پیاده سازی کنید و متد های آن را به کار ببرید. و آن را می توانید در زیر ببینید:
public class HelloSpellCheckerActivity extends Activity implements SpellCheckerSessionListener {
   @Override
   public void onGetSuggestions(final SuggestionsInfo[] arg0) {
      // TODO Auto-generated method stub
   }

   @Override
   public void onGetSentenceSuggestions(SentenceSuggestionsInfo[] arg0) {
      // TODO Auto-generated method stub
   }
}
پس از آن لازم است یک شئ از کلاس SpellCheckerSessionایجاد کنید. با فراخوانی متد newSpellCheckerSession از کلاس TextServicesManager شئ ایجاد شده می تواند به عنوان نمونه قرار بگیرد. این کلاس به متد بین برنامه و سرویس های متن رسیدگی می کند. نیاز است که سرویس سیستم را برای نمونه گذاری آن درخواست کنید. ترکیب آن در زیر ارائه شده است
private SpellCheckerSession mScs;
final TextServicesManager tsm = (TextServicesManager) getSystemService(
Context.TEXT_SERVICES_MANAGER_SERVICE);
mScs = tsm.newSpellCheckerSession(null, null, this, true);
آخرین کاری که باید انجام دهید، فراخوانی متد getSuggestionsمی باشد تا برای هر متنی که می خواهید پیشنهاد داشته باشید. پیشنهادها روی متد onGetSuggestionsمنتقل خواهند شد، جایی که شما هر کاری که می خواهید می توانید انجام دهید.
mScs.getSuggestions(newTextInfo(editText1.getText().toString()),3);
این متد دو پارامتر می گیرد. اولین پارامتر، رشته ای به شکل شئ TextInfo می باشد و دومین پارامتر شماره ی cookie می باشد که برای مشخص کردن پیشنهادها استفاده می شود. علاوه برا این متد ها، متد های دیگری توسط کلاس SpellCheckerSessionو برای پیشنهادهای بهتر ارائه می شوند. لیست این متد ها را در جدول زیر مشاهده می کنید:
cancel()
حالت (pending) را کنسل کرده و فعالیت های بررسی کردن املا را اجرا می کند.
close()
بخش را به پایان رسانده و به TextServicesManagerService اجازه می دهد تا از بررسی کننده املا قطع شود.
getSentenceSuggestions(TextInfo[] textInfos, int suggestionsLimit)
پیشنهاداتی از جملات مشخص شده می گیرد.
getSpellChecker()
اطلاعات سرویس بررسی کننده ی املا را که مربوط به این بخش از بررسی کننده باشد، می گیرد.
isSessionDisconnected()
true، اگر اتصال به سرویس متن این بخش قطع شده باشد.
مثال
در اینجا مثالی ارائه می شود که استفاده از Spell Checker را توضیح می دهد. این مثال برنامه ی پایه ای ایجاد می کند که به شما اجازه می دهد از بررسی کننده املا استفاده کرده و پیشنهاداتی بگیرید.
برای انجام این مثال می توانید آن را روی یک دستگاه حقیقی یا یک شبیه ساز اجرا کنید.
برای ایجاد یک برنامه ی اندروید از Eclipse IDE استفاده خواهید کرد و آن را با عنوان SpellCheckerActivity به عنوان بسته ی com.PRG.SpellCheckerنام گذاری کنید. زمان ایجاد این برنامه مطمئن شوید که Target SDKو Compile With در آخرین ورژن Android SDKهستند تا از سطوح بالاتر API استفاده کنید.
فایل src/MainActivity.java را برای افزودن کد لازم تغییر دهید.
res/layout/main را برای افزودن مولفه های XML مربوطه تغییر دهید.
برنامه را اجرا کرده و یک دستگاه اجرایی اندروید انتخاب کنید، برنامه را روی آن نصب کرده و نتایج را بررسی کنید.
در قسمت محتوای تغییر یافته ی فایل MainActivity.java را مشاهده می کنید.
package com.PRG.SpellChecker;

import android.app.Activity;
import android.app.ProgressDialog;
import android.content.Context;

import android.os.Bundle;
import android.os.Handler;

import android.view.Menu;
import android.view.MenuItem;
import android.view.View;
import android.view.textservice.TextInfo;
import android.view.textservice.TextServicesManager;

import android.widget.Button;
import android.widget.EditText;

import android.view.textservice.SentenceSuggestionsInfo;
import android.view.textservice.SpellCheckerSession;
import android.view.textservice.SpellCheckerSession.SpellCheckerSessionListener;
import android.view.textservice.SuggestionsInfo;

import android.widget.TextView;
import android.widget.Toast;

public class MainActivity extends Activity implements SpellCheckerSessionListener  {
   Button b1;
   TextView tv1;
   EditText ed1;
   private SpellCheckerSession mScs;

   @Override
   protected void onCreate(Bundle savedInstanceState) {
      super.onCreate(savedInstanceState);
      setContentView(R.layout.activity_main);

      b1=(Button)findViewById(R.id.button);
      tv1=(TextView)findViewById(R.id.textView3);

      ed1=(EditText)findViewById(R.id.editText);
      b1.setOnClickListener(new View.OnClickListener() {
         @Override
         public void onClick(View v) {
            Toast.makeText(getApplicationContext(), ed1.getText().toString(),Toast.LENGTH_SHORT).show();
            mScs.getSuggestions(new TextInfo(ed1.getText().toString()), 3);
         }
      });
   }

   public void onResume() {
      super.onResume();
      final TextServicesManager tsm = (TextServicesManager) getSystemService(Context.TEXT_SERVICES_MANAGER_SERVICE);
      mScs = tsm.newSpellCheckerSession(null, null, this, true);
   }

   public void onPause() {
      super.onPause();
      if (mScs != null) {
         mScs.close();
      }
   }

   public void onGetSuggestions(final SuggestionsInfo[] arg0) {
      final StringBuilder sb = new StringBuilder();

      for (int i = 0; i < arg0.length; ++i) {
         // Returned suggestions are contained in SuggestionsInfo
         final int len = arg0[i].getSuggestionsCount();
         sb.append('\n');

         for (int j = 0; j < len; ++j) {
            sb.append("," + arg0[i].getSuggestionAt(j));
         }

         sb.append(" (" + len + ")");
      }
      runOnUiThread(new Runnable() {
         public void run() {
            tv1.append(sb.toString());
         }
      });
   }

   @Override
   public void onGetSentenceSuggestions(SentenceSuggestionsInfo[] arg0) {
      // TODO Auto-generated method stub
   }

   @Override
   public boolean onCreateOptionsMenu(Menu menu) {
      // Inflate the menu; this adds items to the action bar if it is present.
      getMenuInflater().inflate(R.menu.menu_main, menu);
      return true;
   }

   @Override
   public boolean onOptionsItemSelected(MenuItem item) {
      // Handle action bar item clicks here. The action bar will
      // automatically handle clicks on the Home/Up button, so long
      // as you specify a parent activity in AndroidManifest.xml.

      int id = item.getItemId();

      //noinspection SimplifiableIfStatement
      if (id == R.id.action_settings) {
         return true;
      }
      return super.onOptionsItemSelected(item);
   }
}
در زیر محتوای تغییریافته ی فایل res/layout/main.xmlرا مشاهده می کنید.
<RelativeLayout xmlns:android="http://schemas.android.com/apk/res/android"
   xmlns:tools="http://schemas.android.com/tools" android:layout_width="match_parent"
   android:layout_height="match_parent" android:paddingLeft="@dimen/activity_horizontal_margin"
   android:paddingRight="@dimen/activity_horizontal_margin"
   android:paddingTop="@dimen/activity_vertical_margin"
   android:paddingBottom="@dimen/activity_vertical_margin" tools:context=".MainActivity">

   <TextView android:text="Spell checker " android:layout_width="wrap_content"
      android:layout_height="wrap_content"
      android:id="@+id/textview"
      android:textSize="35dp"
      android:layout_alignParentTop="true"
      android:layout_centerHorizontal="true" />

   <TextView
      android:layout_width="wrap_content"
      android:layout_height="wrap_content"
      android:text="Tutorials point"
      android:id="@+id/textView"
      android:layout_below="@+id/textview"
      android:layout_centerHorizontal="true"
      android:textColor="#ff7aff24"
      android:textSize="35dp" />

   <Button
      android:layout_width="wrap_content"
      android:layout_height="wrap_content"
      android:text="Suggestions"
      android:id="@+id/button"
      android:layout_alignParentBottom="true"
      android:layout_centerHorizontal="true" />

   <EditText
      android:layout_width="wrap_content"
      android:layout_height="wrap_content"
      android:id="@+id/editText"
      android:hint="Enter Text"
      android:layout_above="@+id/button"
      android:layout_marginBottom="56dp"
      android:focusable="true"
      android:textColorHighlight="#ff7eff15"
      android:textColorHint="#ffff25e6"
      android:layout_alignRight="@+id/textview"
      android:layout_alignEnd="@+id/textview"
      android:layout_alignLeft="@+id/textview"
      android:layout_alignStart="@+id/textview" />

   <ImageView
      android:layout_width="wrap_content"
      android:layout_height="wrap_content"
      android:id="@+id/imageView"
      android:src="@drawable/abc"
      android:layout_below="@+id/textView"
      android:layout_centerHorizontal="true" />

   <TextView
      android:layout_width="wrap_content"
      android:layout_height="wrap_content"
      android:text="Suggestions"
      android:id="@+id/textView3"
      android:textSize="25sp"
      android:layout_below="@+id/imageView" />

</RelativeLayout>
در ادامه محتوای res/values/string.xmlرا مشاهده می کنید.
<resources>
   <string name="app_name">My Application</string>
   <string name="hello_world">Hello world!</string>
   <string name="action_settings">Settings</string>
</resources>
در اینجا محتوای فایلAndroidManifest.xml را مشاهده می کنید.
<?xml version="1.0" encoding="utf-8"?>
<manifest xmlns:android="http://schemas.android.com/apk/res/android"
   package="com.PRG.SpellChecker" >

   <application
      android:allowBackup="true"
      android:icon="@mipmap/ic_launcher"
      android:label="@string/app_name"
      android:theme="@style/AppTheme" >

      <activity
         android:name=".MainActivity"
         android:label="@string/app_name" >

         <intent-filter>
            <action android:name="android.intent.action.MAIN" />
            <category android:name="android.intent.category.LAUNCHER" />
         </intent-filter>

      </activity>

   </application>
</manifest>
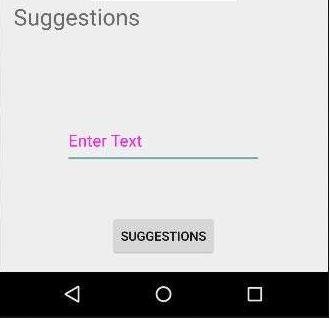
اجازه دهید برنامه ی Spell Checker تازه تغییریافته را اجرا کنیم.فرض می کنیم که شما در هنگام انجام تنظیمان محیط AVD خود را ایجاد کرده اید. برای اجرای برنامه از Eclipse، یکی از فایل های فعالیت برنامه را باز کرده و روی آیکن icon در تولبار کلیک کنید. Eclipse برنامه را روی AVD نصب کرده و آن را شروع می کند. اگر همه چیز در مورد برنامه و تنظیمات آن درست باشد، پنجره ی شبیه ساز زیر نمایش داده خواهد شد.
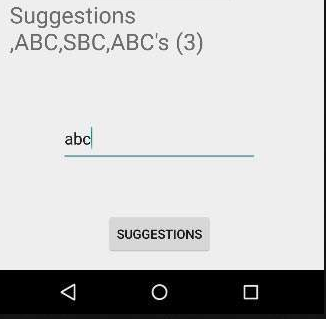
اکنون باید در فیلد هر متنی که می خواهید وارد کنید، من متنی وارد کردم و سپس دکمه ی suggestions را فشار دهید. به همراه پیشنهادها، در AVD شما پیام زیر ظاهر خواهد شد.
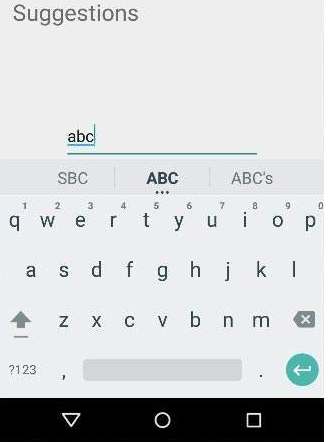
اکنون متن را عوض کرده و دوباره دکمه را فشار دهید، تصویر زیر چیزی است که ظاهر خواهد شد.